If you have songs in iTunes that you want to use for making ringtones for your Samsung Android phone, this is how you do it.
Make Your Own iTunes Ringtones
I own a Samsung Galaxy S phone and am also an iTunes user. Since most of my music is stored within iTunes, I wanted an easy way to take snippets of songs and export them into a format that will work as a ringtone on my phone. The process is quite easy and only takes a few steps, plus you don’t need any additional software. To learn more about using iTunes for creating free ringtones for Samsung phone models using Android, follow the steps detailed below.
Note: In order for this to work, you will need an iTunes account with music stored in it. You will also need the USB data cable that came with your phone, and you’ll need an open USB port on your computer in order to connect the phone.
Select a Song in iTunes
Converting an iTunes song into a ringtone only takes a few clicks. Just follow these steps and you’ll have your ringtone ready in no time.
- Open up iTunes and select a song that you wish to use as a ringtone.
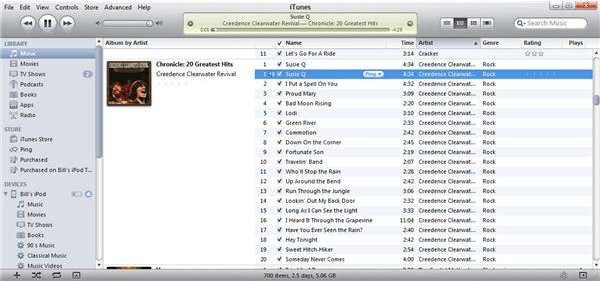
- Right-click on the title of the song and select Create AAC Version from the menu that appears. This will create a copy of the song and usually takes about a minute, depending on the length of the track.
- A second copy of the song will now appear below the original copy. (See screenshot 1 below.) Right click on that second copy and select Get Info from the menu that appears.
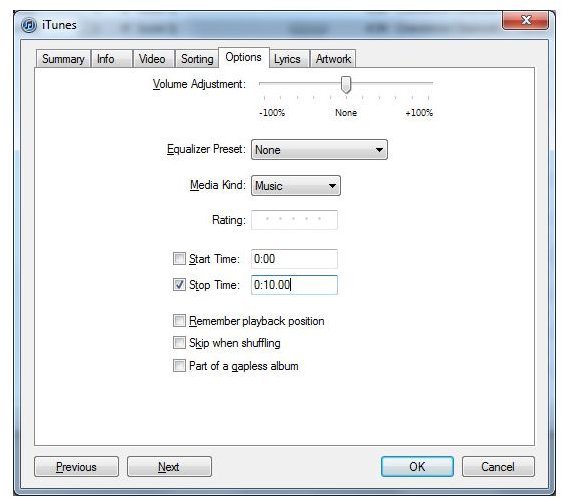
- In the song information window, go to the Options tab and then change the start and stop time to whatever piece of the song you wish to use. In the example graphic (screenshot 2) below, you see I chose the first ten seconds of Susie Q from Creedence Clearwater Revival.
- Click OK to close the song information window.
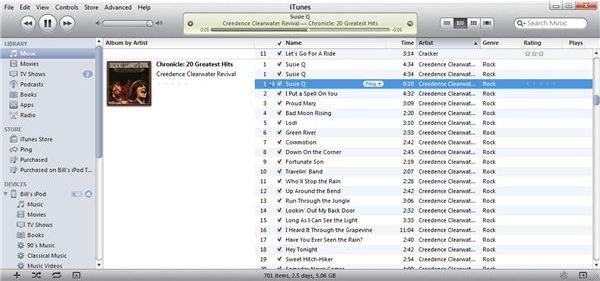
- Right click on the song (the second one in the list) again and select Create AAC Version again. This will create a third copy of the song and it should only be as long as the duration you set in step four. (See screenshot 3 below.)
Your ringtone is now ready to go. For each song you wish to use as a ringtone, just repeat the process. After you have all your ringtones ready, all you have left to do is copy the files over to your phone, and I’ll show you how to do that in the next section below.
iTunes Ringtone Creation Screenshots
Copy the Ringtone to Your Phone
Note: The exact steps of this process vary between phone models, so your menus may be different than mine. For this article, I am using a Samsung Galaxy S .
- Connect your phone to the computer using the USB cable that came supplied with it.
- From the phone’s menu, you need to set it up to work as a disc drive. On the Galaxy S, this is done by sliding down the top menu bar, then pressing USB Connected and selecting Mount. It will take a few seconds then the phone’s internal storage will show up on your PC under ‘Devices with Removable Storage’ in Windows 7.
- Open the drive letter for your phone and look for a folder called media, then open it. If the folder does not exist, create one.
- Under the media folder, create a new folder called ringtones (unless one already exists) and open that folder.
- From iTunes, select the ringtone file and drag it over to the ringtones folder on your phone. It’s just like copying a file to a flash drive.
- Once the copy is complete, feel free to delete the two extra copies of the song from your iTunes library, as you won’t need them any more. Just be careful not to delete the original.
The song sample is now loaded on your phone and you can use it as a ringtone or set it as an alert for any number of things. It will also show up in the Music Player app as well as any other Android audio apps you have installed.
References
- Author’s personal experience with iTunes and the Samsung Galaxy S.
- Screenshots taken from author’s personal PC.


