Guide to Using the HTC Contact Manager

Keeping Your Friends Close
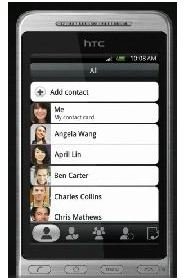
The HTC contact manager can be found under “people” on HTC phones. By default, it will allow you to view all your contacts at once. You can also press the second icon along the bottom to open your groups, which you can use to organize your contacts. Whether viewing all contacts or your groups, you can edit selections by touching them to open them. Once you’ve selected a contact, you will see a screen with the current saved information for that contact. This is your contact card. From this screen you can change a few of their options, such as the ringtone set for them, whether or not you want to send them straight to voicemail (in case you’re screening calls from certain people) and speed dial options. At the bottom of the contact card, you should also see an option to edit that contact, allowing you to change the information you have saved for them. You can’t do much with any contacts until you’ve added some to your phone, though. The easiest thing to do is synchronize your phone to another source and carry your contacts over.
Syncing Contacts From Other Accounts
If you’re using the same SIM card you were using in your previous phone and you had your contacts saved to that SIM card, you may already have many of your contacts on your new phone. The SIM card (subscriber identity module) is the little chip underneath the battery of your phone. It is what identifies the phone as yours and connects your subscriber information with your provider to your phone hardware. In many cases, it can also be used to save some information, such as contact lists. If your contacts are not on your SIM card or you’re using a new card, however, there are a few ways to carry your contact lists over from other places.
From the contact manager screen, you can press the menu button and select to import contacts from a previous SIM card or an SD memory card. (You can also export your contacts to an SD card to make it easy to transfer them to another phone down the road.) You can also select company directory to move business contacts over using Exchange ActiveSync, a service designed to synchronize a messaging server to your phone. You can also synchronize your phone to a Gmail account and use that to import contacts. When you first set up your phone, the initial setup will ask if you want to synchronize your phone to a Google account.
If you skipped that step at first, select menu and settings from your home screen, then “accounts and sync”, and add the account there. If you encounter problems with synchronization, which you may if you skipped this step at the very beginning, perform a factory reset on your phone by selecting menu and settings, then select “privacy,” and finally “factory data reset.” This will erase all information on your phone and allow you to set it up from scratch again.
Of course, you may not be able to get every contact you need from other sources, and you will sometimes meet new people. Click on the “add contact” button at the top of the people list to create a brand new contact card and go through the process manually.
Adding and Editing Contacts
When you create a new contact, the first thing it will ask is if you want to save it as a phone, SIM, or as a Google contact. SIM contacts save to your SIM card to be easily transferable. Phone contacts save to your phone’s hardware, and Google contacts save to the Google account synced to your phone. Each type allows different amounts of contact information to be saved, however.
Once you’ve created a new contact or selected one to edit, the contact card screen will come up. We’ll walk you through the “Phone” type of contact card, since SIM card contacts only allow for a name and phone number. First, enter the contact’s name in the box at the top. You can enter first and last name, and a display name if you want them to appear in your contact list as something else. Then, you can click on the camera icon next to that box to select to associate with them. Next, enter their phone number in the next box, and touch the button next to it to label what type of number it is. (Mobile, Home, etc.) If you want to add more than one phone number, click on the add more information button at the bottom of the card and repeat. The next box is for their e-mail address, and again, if you wish to add more than one, select “add more information” at the bottom. Following that is the group you wish to add them to, if any, and then there is an events bar where you can put in a birthday or anniversary, or you can put in both by adding the second using the button at the bottom again. Using that button you can also add their address, the company they work for, and IM information for services such as AIM, Google Talk, and others. You can also click the “X” on the right next to any piece of information to remove it.
Once you’ve filled out their contact card to your satisfaction, simply press the save button to finish. If you create a Google account contact instead of saving to the phone, things are almost identical, but you will also be able to label their e-mail addresses like the phone numbers, the events bar will have a third “other” option, and you will be able to put “notes” on their contact card.
References
- Source: Author’s own experience.
- Image from official HTC media gallery, https://www.htc.com/us/discover/media-gallery