How to Make a Table to Center a Flash Website

Introduction
You may have seen them, websites created with more than just HTML markup, including interactive multimedia formatting and all kinds of effects. These specially-designed websites are usually built using Flash technology; as such, the appearance and layout of the various elements used to present these sites takes careful planning and certain techniques for the optimal appearance necessary for the professional look-and-feel that visitors expect. Since the use of Flash to present the contents of a website requires the positioning of the interactive portions at dead-center in the browser window for optimal appearance, this tutorial will demonstrate and explain how to pull off this effect to give your website data the requisite edge of professionalism.
Starting the Job
To start learning how to make a table to center a Flash HTML website, you need to create a new HTML document or load one created with your Flash website file if applicable. In this case, I started with an auto-generated HTML file alongside my Flash test file (which you’ll want to actually be your Flash website file, as this is only done here for demonstration purposes).
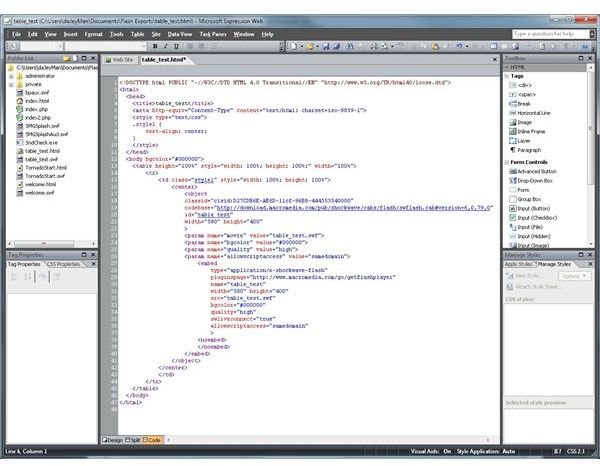
My starting HTML file looked somewhat like this:
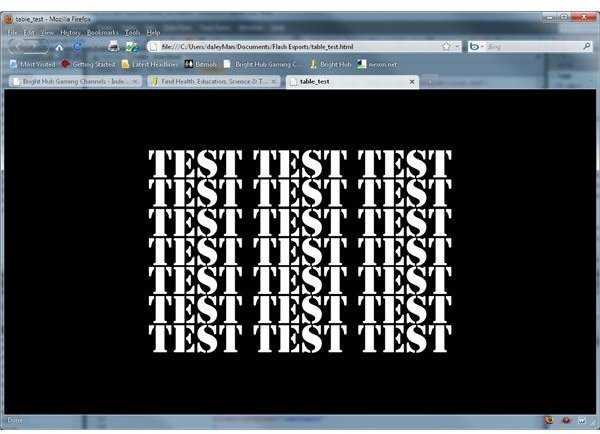
Hence, my starting layout in the browser looked like this:
From here, I will proceed to show you how to take these examples toward the final product, and make a few notes as to how your situation may differ.
Adding the Necessary HTML Code
How to make a table to center a Flash HTML website: Adding the Necessary Code
Because I started with a pre-built HTML file, I only had to make a few small edits to reach the final layout. If you started from scratch, you’ll have to configure each portion of the HTML file manually. If so, I will provide the necessary guidance for you to add the needed information.
For those of you who are starting from scratch, the additions I made to my HTML export are not entirely necessary, but were used for a fully-centered Flash site effect; meaning, centered within the entire dimensions of the browser window. Also, since this article uses a table to center, the Flash website result goes against the XHTML specifications. Thus, you need to define the document model of the HTML page as loose interpretation, because certain specialty web page editors (such as Microsoft Expression Web) will call you out on the formatting if you don’t make this designation. Defining the document model as loose interpretation (known in W3C conventions as transitionary due to its intended purpose) is as easy as putting the following line at the top of the document code:
Naturally, if the document type is defined as strict upon creation in the editor, you simply need to select the line above and hit Edit/Copy. From there, simply switch over to the document you are editing and select the existing document type definition. Hit Edit/Paste after wards. Don’t paste in the definition without selecting and removing the existing definition. There is only supposed to be one and one only.
Now add the following to the document, immediately after the opening tag:
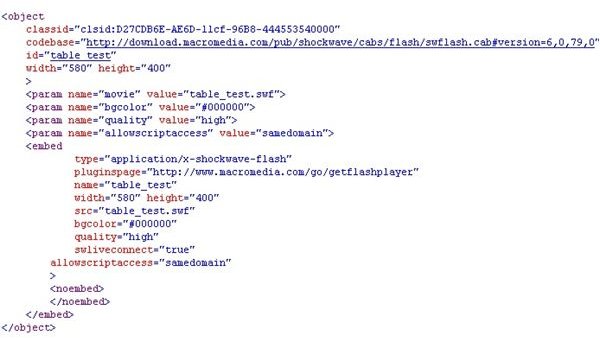
This is the first point where my starting file differs from the guide. Since the goal of this tutorial is to provide a full step-by-step tutorial on the subject, it is necessary to point out what those of you who are starting from scratch need to do. Also, if you do need a body tag set (or any HTML tags for that matter) simply add what you need from the following, and modify as appropriate: Inserting the Object Definition for the Flash Website FileNow we need to add the object definition to the HTML file so that the Flash content will actually be displayed when the page is opened, as shown below:
Note that you will have to click the image I placed above this line in order to view the whole object definition, as it is a bit long to simply put into a text block. Nonetheless, I have a version from which you can copy and paste that is ready for use. Also note that the download data is for Internet Explorer users, so you might wish to create a teaser page or other method of getting the latest Flash Player release. Firefox does have a plugin search feature, but other browsers (Safari, Chrome, etc.) do not have as much flexibility. Thus, having a download method for users who do not have the latest Flash player should definitely be taken into account. Finishing the JobThere are a few final things we need to do to finish the job. First, if your HTML editor of choice did not add the closing tags for the page body, tabular data, and so forth, just copy and paste the following to do the job at the end of the markup: |
Next, go back to the opening tag of the page body definition and refer to the background color definitions in both the style and traditional definitions, but don’t change anything yet. Instead, save your work up to this point and open up your saved HTML page in your browser.
Please note that you do not have to do this if the background color definitions were auto-configured based on your Flash website file configuration. Do this only if you started from scratch.
With that said, if you need to set the color data manually simply Alt+PrintScreen your open HTML file in your browser; then open up a professional image editor (Windows Paint will not cut it here; you need to use Photoshop or the GIMP, the latter of which you can download if you need it) and paste in the copied screenshot accordingly. Of the two, the GIMP is somewhat easier so my example will follow suit (for Linux, Mac and/or Photoshop users, please adjust as required). Once the screenshot is pasted in, select the color picker from the toolbox, then move the mouse pointer over the Flash portion of the screenshot and left-click. Next, double-click the HTML notation and copy it (see below for the applicable locations).
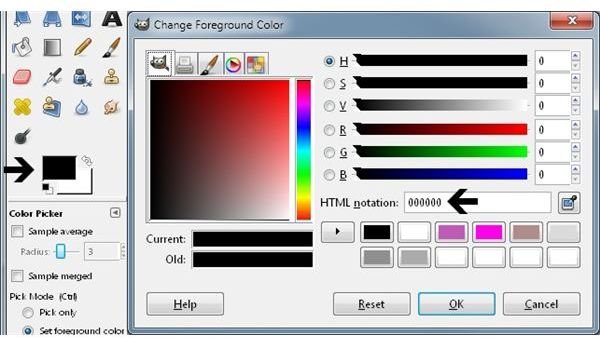
Now simply paste the hex code over the existing definitions to finish (but leave the pound-symbol, or else it will not work).
One Last Thing
As a optional step, you can change the opening tags of the table definition so that they read like this:
This will center the Flash website on both horizontal and vertical dimensions, giving you the final HTML code that is similar to this:
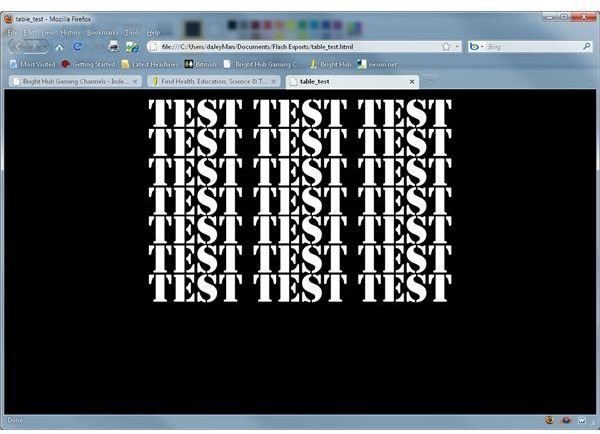
And the final result will look like this:
With that, you have completed your work! As a final reminder, these examples represent a test configuration, and should be replaced with the requisite details for your website. They are in no way intended for anything else. You can still copy and paste what you need, of course. I’m just saying this for disclaimer purposes. |