Lyte box (lightbox) is similar to a popUp window but much, much better. It opens in center of user’s screen and dims the entire page in the back with your chosen color. This allows you to open a new window but keep your current page in the background.
Let’s Use Lytebox
Lytebox is used instead of a pop up window or a new tab. Because Lytebox opens a new page within the same window, it is able to bypass pop-up blockers. Lytebox can be used for many things, such as photo gallery to enlarge a specific image or to show a sign-up page. In this article we will be creating a new project and using a sign-up page within Lytebox.
Step 1. Create a new web site project within visual studio.
Step 2. Download lytebox.zip file from here.
https://www.brighthub.comhttps://images.brighthub.com/media/4DA880_lytebox.zip
Step 3. Extract lytebox folder from the zip file and place it in the root folder of your web site.
Step 4. You should already have default.aspx file, open up that file and view the source code.
Step 5. Enter the below code within the Page_Load event of default.aspx. Please note that the folder Lytebox is within the root of your web site.
//setting lytebox
this.Page.ClientScript.RegisterClientScriptInclude(“lytebox”, base.ResolveUrl(“Lytebox/lytebox.js”));
Control ctrl = this.Page.Header.FindControl(“lyteboxCss”);
if (ctrl == null)
{
HtmlLink lnk = new HtmlLink();
lnk.ID = “lyteboxCss”;
lnk.Href = “Lytebox/lytebox.css”;
lnk.Attributes.Add(“rel”, “stylesheet”);
lnk.Attributes.Add(“type”, “text/css”);
this.Page.Header.Controls.Add(lnk);
}
//end lytebox
The code above is looking for attribute “rel” within the entire default.aspx page and adding proper lytebox css and javascript URL on the run time.
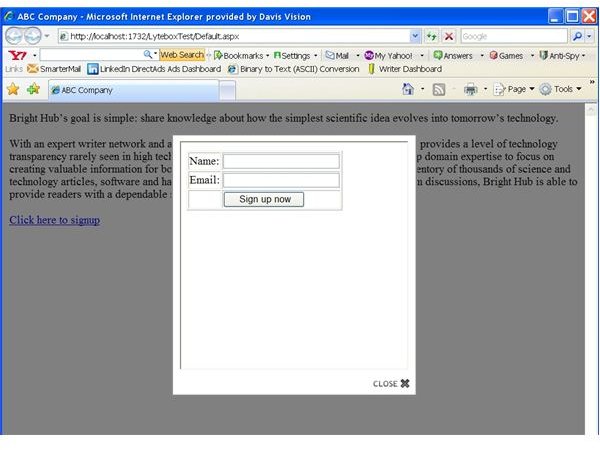
Step 6. View the design section of the default.aspx page and add some text (sample text) and below the text create one hyper link.
<a href=“Signup.aspx” rel=‘lyteframe’>Click here to signup</a>
Notice I used rel=’lyteframe’ this is used by step 5 above. And also notice the “Signup.aspx” page you are about to create in Step 7.
Step 7. Now we have to create a new page so our lytebox can load it within the default.aspx page. Right click on your project name and add a new web page and name it ‘Signup.aspx’
Step 8. Add anything within this page, I added a html table and two fields, name and the email address with a button. You can add text, images or tables, its totally up to you. If you would like to add a table, here is the code,


