Often a Web designer needs to let a user choose from multiple options on a Web form. The ASP.NET Checkbox web control is tailor made for this and generates needed code automatically. Each control displays a single box, which can be checked or unchecked. You simply add a box for each possible choice.
Although you can create ASP.NET pages in other Web development programs like Dreamweaver or Microsoft Expressions, there are some advantages to working with ASP.NET in Microsoft’s free Visual Web Developer 2008 Express Edition (VWD 2008). This example uses the latter software.
Add ASP.NET CheckBox Controls to a Form
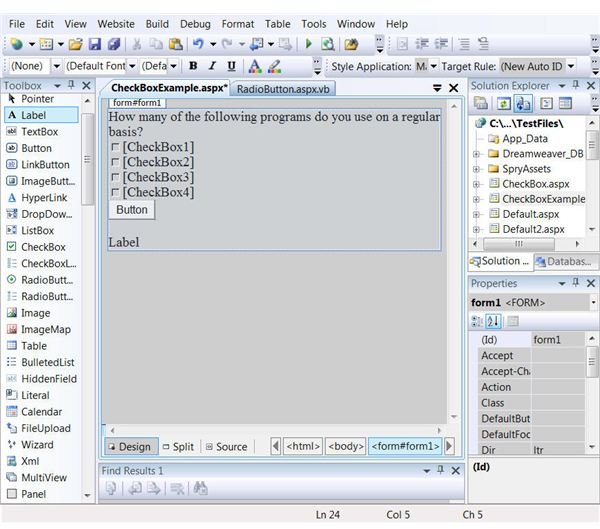
Create a new file in VWD2008 for this example or add an aspx page to an existing Web form by clicking on “Website,” “New Item.” From the screen, choose “Web Form,” name the file “CheckBoxExample” and click “Add.” The new file saves as an aspx file. Click on the “Design” tab at the bottom of the display to change from Source code to a What You See Is What You Get editor. In the outlined box at the top of the page, type this, “How many of the following programs do you use on a regular basis?”
Move the cursor with the mouse below the box holding the text you just type. There are two CheckBox-like controls in the ToolBox on the left. For this example, use the first one with an icon of a small box with a checkmark in it. The second control is the CheckBoxList, with a tiny list type icon. Use this control when you plan to create a list of boxes based on data stored in an online database. Double click on that first CheckBox control. After the new control on the page, press “Enter” to put the next one on a new line. Repeat this process until you have four CheckBoxes on four lines. Finish the initial design by adding a Button control on a new line below the last CheckBox and a Label control on a line below the Button control. The result should look like the image shown.
Customize the Design
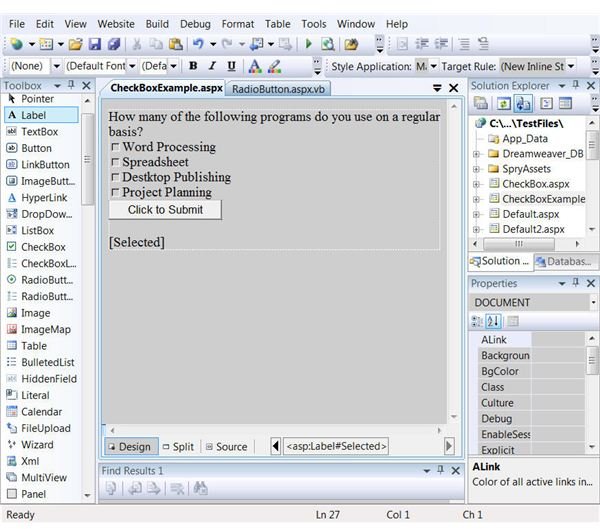
Use the “Properties” panel on the right side of the screen to make the following changes to the ID and Text of each control, clicking on the control first to focus on the correct properties:
CheckBox1. Change ID to “WordProc” and Text to “Word Processing”
CheckBox 2. Change ID to “Spreadsheet” and Text to “Spreadsheet”
CheckBox3. Change ID to “DeskPub” and Text to “Desktop Publishing”
CheckBox 4. Change ID to “ProjPlan” and Text to “Project Planning”
Button. Change the ID to “Submit” and Text to “Click to Submit”
Label. Change the ID to “Selected” and clear out the text.
The image shows these changes. Note: ID properties cannot include spaces or special characters.
Find Out What the User Chose
Double click on one of the “Submit” button to open the Visual Basic code window on the file named “CheckBoxExample.aspx.vb” to edit the code. Use the following example to code for the first box and then repeat for each one, substituting the relevant ID:
If WordPub.Checked then
Selected.Text &= “ You use Word Processing software.”
End if
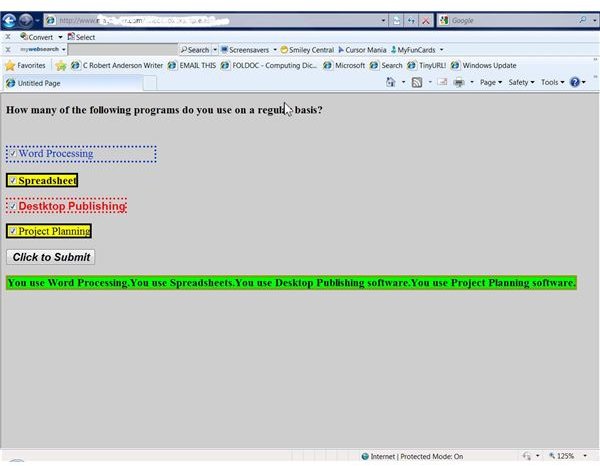
The reason for using “&=” is to retain the last variable and concatenate it with the next so that if the user selects more than one, all will be displayed. The purpose of the Label control is to demonstrate the result. Normally you would use the results in some other way.
There is just one other piece of code you need to add to the Submit button. Even though you cleared the text property of the “Selected” label at design, when the page runs in a browser, the preceding results would appear in subsequent refreshes. One way to handle this is insert a “Clear” command button and associate code with it to reset the text values to nothing when all CheckBoxes are cleared. A simpler way is to put one additional line at the beginning of the code lines you just created. Add this: “Selected.Text = "" which will set the text to nothing.
Edit attributes of each ASP.Net CheckBox and Button using the Properties to set font, size, border color and style as well as other formatting options. The final image is a live Web shot to show overdone formatting for illustrative reasons.


