Creating a Syllabus in Dreamweaver: Tutorial With Sample Template & Code
Syllabus Design and Usability
When you come across a usable site, it seems obvious and the usability techniques that went into building it are often overlooked by the viewer. Usability is the ability for users to find what they looking for easily. Usability is part of the characteristics of a good e-learning site – such as readability, presentation and writing for the web. When creating a syllabus in Dreamweaver, it is important to apply proven usability techniques.
Never underestimate the importance of white space for readability and presentation**.** White space breaks up the contents into readable chunks. Smaller paragraphs make information more digestible and easier to scan.
When writing for the web, dense text is one of the major reasons a user leaves a site. You should typically use half the amount of words as you would with printed material.
Formatting Text and Content
Web text should always be kept short and easy to read. When creating a syllabus in Dreamweaver, keep each paragraph to one topic sentence and one main idea. Students should be able to read the topic sentence and then decide if they need to read the rest of the paragraph.
Your syllabus should be able to display on a variety of browsers and computers. It is important to consider older browsers for approximately five to six years after any updates.
Create the content for your syllabus before you start creating a syllabus in Dreamweaver. Information to include should be based on your school’s guidelines and course information such as prerequisites, course description, course requirements, material, and the course objectives. Other information to include should be registration information and how to login into the school’s online learning system.
The visual design should include the correct typography and colors. Text should not be too small and should not blend in with the back ground. The goal of your syllabus is to communicate information; therefore your font should be legible along with representing the professionalism of your site. When choosing a font size it is best to use the percentage option in Dreamweaver. This option allows the font to adjust to the size set by the user’s monitor. Do not use all capitals, this is hard to read and comes off as shouting. Do not use serif font for the web, use a transitional serif fonts such as Georgia, Veranda or Tahoma that lacks extra curves and is easier to read on a monitor.
On the next page, you will learn how to create a new site in Dreamweaver and how to add and adjust a CSS file.
Create New Site
Create a new site in Dreamweaver for your syllabus by clicking Sites > New Site.
Click on the advanced tab in the dialog box and select local info category located on the left. For the site name type in “syllabus” then click the folder icon located next to the local root folder field and navigate to your syllabus folder, and click ok.
CSS
Now create an HTML and CSS page.
- Click on File > New > HTML then click on the CSS layout labeled “One Column Fixed Center, Header and Footer”.
- Next to Layout CSS click > Create New File for the Layout CSS setting. Navigate to your file folder when the New Document box pop ups. Name it “Style” and then click ok to save.
- Click >File > Save As > and navigate to your file folder to save your HTML file as “syllabus.”
For a quick start, you may also download sample HTML and CSS files by clicking here.
Clean Up the CSS
Clean up your CSS file by clicking on file > open> and navigate to where you saved the “style” file. Click ok to open.
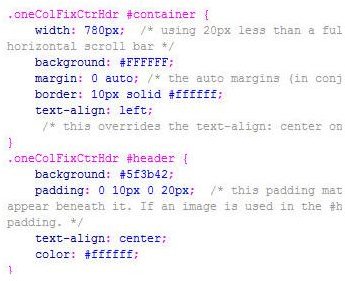
Change the background color under body from #666666; to #5f3b42; or a color of your choice. Repeat for the background color of the .oneColFixCtrHdr #header.
Change the border color under .oneColFixCtrHdr #container to white #ffffff. Copy the text-align: left; and paste it under .oneColFixCtrHdr #header. Change the text-align: from left to center;. Change the header font color to white by adding color: #ffffff; .
Your CSS file should look like this (click image for a larger view):
Header Alignment
Copy and paste the following alignment information for the the .oneColFixCtrHdr #header:
padding-top: 2.5px; border: 20px solid #FFFFFF; padding-top: 0px; padding-right: 5px; padding-bottom: 5px; padding-left: 5px; margin-right: 0px;
Copy and paste the following code for .oneColFixCtrHdr #mainContent:
color: #000000; background-color: #FFFFFF; margin: 0%; padding-left: 15px; padding-top: 20px; padding-right: 20px; padding-bottom: 20px;
.
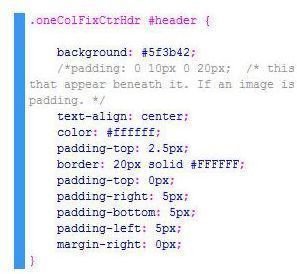
(Click image below for a larger view)
Add Navigation
Create a navigation area by pasting the following code underneath .oneColFixCtrHdr #mainContent
#navigation {
color: #000000; background-color: #FFFFFF; padding-left: 25px; padding-top: 5px; padding-right: 5px; padding-bottom: 20px; }
Copy and paste the rest of the code underneath the navigation:
ul{ list-style-type:none; margin:0; padding-left: 45px; padding-top: 0px; padding-right: 5px; padding-bottom: 0px; }
li{ display:inline; padding-left: 15px; padding-top: 05px; padding-right: 15px; padding-bottom: 5px; }
a {color: #5f3b42; text-decoration: underline }
h2 {color: #ffffff; }
h3 { font-family: Georiga, Verdana, Helvetica, sans-serif; font-size: 100%; color: #ffffff }
h4 { color: #000000 } .style1 {font-style: italic}
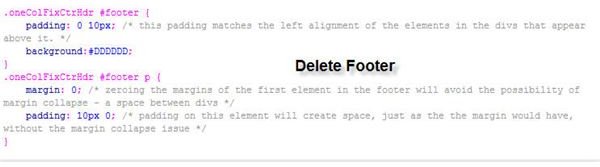
Delete Footer
Delete the footer information located at the end of the CSS file. See image below. (Click image for a larger view)
Save your file.
On the next page, you will learn how to use CSS in the HTML file and how to create navigation that will go directly to the sections in your syllabus.
HTML
Click back to your syllabus HTML file and view your file by clicking on the globe, located on the code and design bar. Choose your browser such as safari or IE to open a new browser. You should see a colorful background instead of the default gray along with a white text, centered header.
Back in Dreamweaver; replace the default header with your course prefix and number. Highlight it and in the properties window change the format to Heading 3. See image below. Hit your enter key to move to the next line and enter Course name. Change the format to Heading 4. (Click image below for a larger view)

HTML Navigation
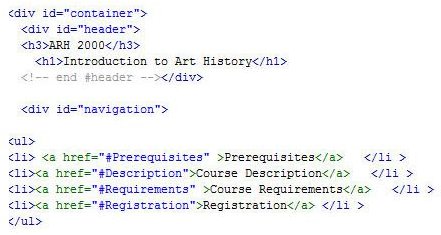
Click on the Code tab, located on the Code and Design bar and copy and paste the navigation code underneath the header.
(Click image below for a larger view)
Main Content
Copy and paste the following code to get started with the main content:
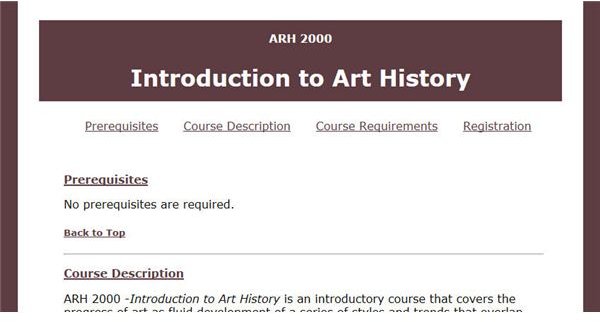
No prerequisites are required.
Back to Top
ARH 2000 -Introduction to Art History is an introductory course that covers the progress of art as fluid development of a series of styles and trends that overlap and react to each other as well as to historical events.
(Click image below for a larger view.)

Finish Up
To add additional information copy and paste the main content code for each section of your syllabus. The # key in the navigation code links up with the section heading. An example is “#Prerequisites" in the navigation links with “name=“Prerequisites” in the main content. When you click on the link it will take you directly to that part of the syllabus. Below is an image of what you just created and you can download the HTML and CSS sample files here. (Click image for a larger view)
Works Cited
Syllabus Design Adapted from Dr. Baron’s Web Design Course
Nielsen, J. (2000). Designing Web Usability. New Riders.
Screenshots taken by author.
This post is part of the series: Creating an Online Course
Creating an Online Course article series covers the characteristics of a good e-learning site that is based on proven techniques, Lesson include creating a Syllabus, WebQuest and Rubrics. Future articles will cover using usability techniques in Blackboard. Images and an example file are included.