Google’s free service just does not stop. Now we can use another map service Google is offering, Google’s Static Maps. Static maps are helpful when we cannot use full blown Google Maps API.
Static Maps Image
Last week I covered how to use Google Maps API within your HTML or ASP.Net page. Now, we’re going to talk about another way to include Google Maps within your webpage. Google Static Maps- API lets you use a static or still map. Static maps are useful if you want to give website users an idea of where your business is located within your city.
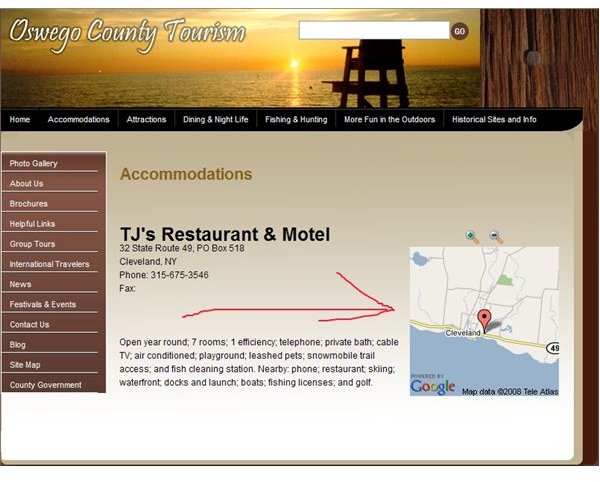
Before I begin listing pros and cons of Google’s Static Maps, let’s take a look at the screen shot below of a static image map. The screen shot is of NY’s Oswego County’s website.
When I was developing the website for the Oswego county tourism, I had two options, either use Google Maps API or use Google’s new “Static Maps” API. I decided on Static Maps over regular map due to many reasons.
The first reason is that Static Maps take less time to load within any page of a website. When you start working with the dynamic panels of one page like I’m using in the Oswego’s website, using Static Maps API is much better than regular map.
Another reason for using Static maps in this case has to do with how complex you want your code to be.
You also need to look at what the user will do with the map. For example, for the Oswego county site, I needed to show a map of a specific Bed & Breakfast, or a Motel, then a static map is best, because static maps load quickly and display specific information. However, if the requirements are to allow user to interact with the map, such as double click to zoom, see driving directions, etc. in that situation we cannot use Static Maps API.
Let’s see how we can embed the Static Maps within our page in two simple steps.
Step 1. Create an image tag within your HTML or ASP.Net page by using
Step 2. Give the image tag height and width; this will be used to show the Static Maps image.
Here is the code from step 1 and step 2.
<img src=“https://maps.google.com/staticmap?center=42.732419,-73.690989&zoom=14&size=512x512&maptype=mobile \&markers=42.732419,-73.690989,blueb%7C42.723797,-73.69586,greenx%7C42.725988,-73.69983,redy&key=ABQIAAAA-O3c-Om9OcvXMOJXreXHAxSsTL4WIgxhMZ0ZK_kHjwHeQuOD4xSbZqVZW2U_OWOxMp3YPfzZl2GavQ” border=“0” align=“left” />
I know it seems little confusing and I will explain what this one image tag does. First, let’s see the source (src) of the image tag.
https://maps.google.com/staticmap
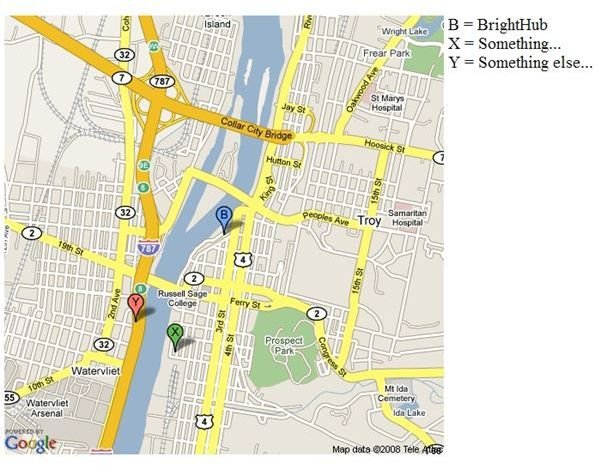
It tells our image tag to use Static Maps API. Second, we need to pass latitude and longitude (pass means to send the data) of all of the locations we need to mark on the map. In most cases we only need one mark on the map, but in this example I’m showing how to add three marks. Notice, we set one of the latitude and longitude to represent the center point of the map, and then we pass all of the lat/long to the API.
markers=42.732419,-73.690989,blueb%7C42.723797,-73.69586,greenx%7C42.725988,-73.69983,redy
We need to pass lat/long by using a query string argument “markers”. I first pass one lat/long and the marker color it should use. You can see I have “blueb” in the end. Blue stands for the blue color and “b” in the end of the blueb tell the API to show “B” in the marker. We cannot pass any capital letters, so that is why I’m passing “blueb”. Simpilar to this, I also pass another lat/long with “greenx”, which starts for green market that will show “X”. Please see the screen shot below “Sample Static Map”.
That is all, now you have a page that will show Google Maps using the API, offered by Google for free.
Of course, I have a complete project which you can download and see how it works. You can download my finished sample project from here: https://www.brighthub.comhttps://images.brighthub.com/media/29E18B_googlemapapisample.zip
Images