How to Make a Model Windmill Electricity Generator
Introduction
Windmill electricity generators are machines designed for converting natural wind power into electricity. It basically consists of huge blades curved at definite angles and pivoted at the center. Wind flowing across these blades becomes trapped into them and in course forces them to rotate. The rotating central shaft of these blades is connected to an electric motor, which immediately starts producing electricity as it rotates.
Making power out of nothing can be real fun and that, too, if it can be done sitting at home. This article discusses a small experimental set-up and explains how to build your own small windmill electricity generator.
Building A Windmill Electricity Generator
Normally windmills built with horizontal shafts are quite efficient in the operation of harnessing and exploiting a maximum quantity of wind into electricity. However, wind direction keeps changing and this produces a serious drawback with such prototypes. Optimizing its position with respect to the wind direction becomes a big challenge.
The problem is easily tackled by incorporating a rudder to sense wind directions, but a complicated mechanism then becomes inevitable. In the proposed design, the above principle is totally avoided and a rather unconventional approach is used that proves relatively more convenient.
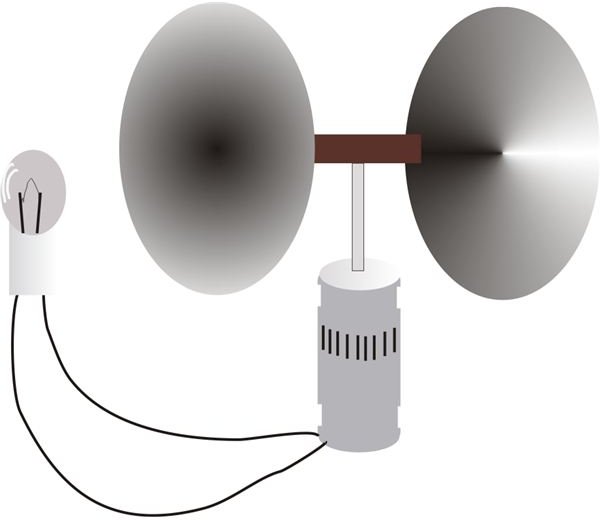
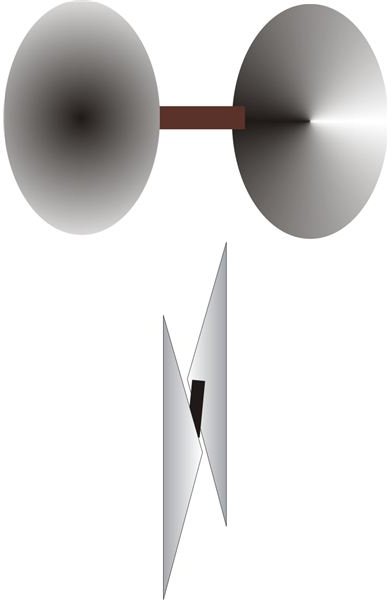
We all know about anemometers and have seen them spinning rapidly in response to the sailing winds over meteorological departments. It consists of a horizontal shaft with cup or bowl shaped objects placed at their extreme ends with their hollow portion oriented in opposite directions. This assembly is supported over a vertical axis. Wind striking the above cups get trapped in them and forces a displacement, causing a rotational movement over the central vertical axis. Once a rotational flip is initiated, it presents the alternate cup facing the wind to sustain the rotation.
A careful analysis will show that this apparatus is not dependant on the direction of the wind and will keep rotating irrespective of changing wind paths. Moreover its spin direction also remains fixed.
However, as discussed here, the involvement of just two cups may not produce sufficient thrust and may require greater wind speeds to generate ideal results, so one may simply go on to add more than one cup assembly as shown in the diagram to increase its efficiency.
You will require the following items for the project:
Thin tin sheets – 12 by 12 inches, 2 each,
A pair of scissors,
A DC electric motor – Retrieved from a small portable CD player or a walkman (6 volts).
Wooden strip – a foot long,
Hand drilling tool,
Glue – instant fix type and also RTV silicone.
**

Procedure:
The procedure is quite simple:
Cut the tin sheet into a circle and bend it suitably to form a wide mouthed cone, glue its joint immediately so that it doesn’t recoil. Make two such cones. Make sure the conical rear portion remains as smooth as possible without any disfigurements whatsoever.
Take the procured wooden stick and drill a tiny hole exactly at the center of its length such that it matches and snugly fits the motor spindle. Attach it with the motor spindle and glue it using RTV.
Now, Insert and glue (using RTV) the cones to the above stick as shown in the figure.
Fix the whole assembly along with the motor (clamp it) to a firm wooden base.
Connect a small 3 volt incandescent bulb to the motor output wires.
Preferably take the whole assembly to your house terrace. Fortunately if the conditions are windy, your windmill electricity generator should immediately start functioning.
After it reaches a particular optimum speed, you should be able to find the bulb being illuminated.
By suitably modifying the rotor and the motor size, the power of this unit can be increased to any proportion, and the same theory may be used for powering an entire house.
