How to Make a Solar Cooker at Home?
Introduction
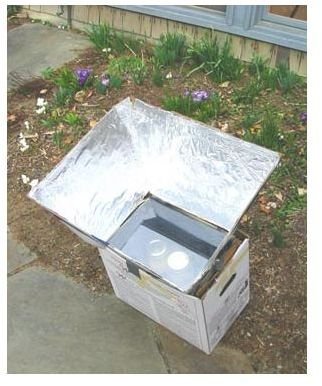
A solar cooker is a highly efficient, durable and modern method for cooking food. Basically, a solar cooker or solar oven is a bowl shaped device which uses sunlight as the source of energy. It is one of those few cost effective tools which needs no fuel. Moreover, it is extremely cheap to construct. The article describes as to how to make a solar cooker at home.
Preparation
The solar cooker works on the principle of the convergence of the sun’s rays at one point. This focal point is the place wherein the food item to be cooked is placed.
You will require the following things before starting the process:
- Aluminum Foil
- Glass
- Cardboard
- Two square cardboard/wooden boxes – One, a few inches smaller than the other one.
- glue
Now as mentioned earlier, there would be two boxes. The smaller box will go inside the bigger one and will serve as the cooking area. The bigger box should be two to three inches greater in size comparatively. For a medium sized cooker, the mouth of the inner box should be around 140 square inches and with a depth of 10 inches. The process also requires white paper glue, an efficient and a good quality of aluminum kitchen foil.
In addition to this, a piece of thick glass which is an inch larger in length and width than that of the smaller box is required. The edges of the glass should be made blunt to make the glass less sharp and harmful. Dark black paint will also be needed but in a very small quantity. An empty baking tin is needed to form a rack in the smaller box, along with some strings, cotton cloth, and a few thick cardboard pieces.
The Process
- Before placing the smaller box inside the bigger one, make sure that the thick cardboard pieces are placed in the bottom of the larger box. This should allow the smaller box to have one inch lower rim than that of the larger box.
- Now adjust the smaller box in such a way that it is exactly in the center. Add more of cardboard pieces or other stuffing matter if needed. Also, more the cardboard stuffing, better positioned and more insulated would be the inner box.
- The upper portion of the insulation pieces, which are located at the bottom of the bigger box, should be arranged in such a manner that the glass works like a seal at the top rim of the smaller box. This will help in removing the glass whenever needed and also in retaining the heated air.
- The inside of the container should be painted black to attract maximum sunlight. To prevent any kind of tear and to make the handling process easier, handholds can also be cut in the sides of the larger box.
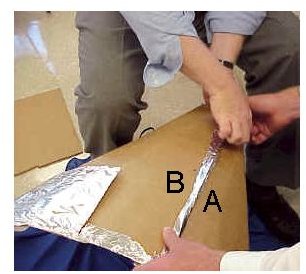
- Now in order to make a collector or reflector that captures the maximum amount of suns rays, a cardboard of the size of other box measurement needs to be cut. For this, measure the length and breadth of the outer box and cut the cardboard exactly of the same measurement. The collector can also be separately made and then fitted to the container boxes.
- Before fixing the cardboard collector to the boxes, the collector should be covered with aluminum foil and bend over at the edges so that there are no wrinkles remaining. The cardboard collector can then be stapled or glued to the edges of the box.