Applesauce is one of the easiest foods to make and can at home. These step-by-step instructions ensure success, whether you are a canning pro or a beginner.
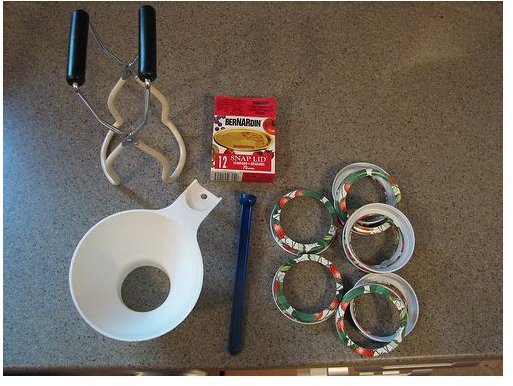
Step 1: Gather and Wash Tools
Assemble all the tools you will need to process the applesauce in a water bath canner . Thoroughly wash each item in hot, soapy water. You will need the following canning necessities for your project:
-
Water bath canner
Advertisement -
Jar lifter
-
Canning jars (usually 7 pint or quart jars will fit in a water bath canner at once)
Advertisement -
New, unused flat jar lids
-
Screw bands (the ring part of the two-piece lid)
Advertisement -
Funnel
-
Small saucepan for warming 2-piece lids
Advertisement -
Damp, clean towel or paper towel
-
Tongs
Advertisement -
Large stockpot for making applesauce
-
Ladle
Advertisement
When selecting and washing canning jars, inspect each jar for small nicks or cracks in the glass. Discard any jar with even minor blemishes, as these weak spots can cause the jars to break during processing.
You will need to keep the canning jars warm until you fill them with hot applesauce. You can either hold the jars in boiling water after hand washing, or wash them in the dishwasher and keep them warm on the dry cycle.
Make the Applesauce
You will need approximately 2 1/2 to 3 1/2 pounds of apples per quart jar of applesauce you wish to make. For seven quart jars, you should use between 20 and 25 pounds of apples. Any apple variety can be used by itself or in combination with others to make sauce. Adding sugar to your applesauce is optional. Taste the sauce after the apples have cooked down and add sugar if desired.
Wash apples, cutting out any small bruises or blemishes. Core and peel the apples and cut them into quarters. Alternatively, you can use an apple peeler-corer-slicer machine to prepare the apples for cooking.
Place the apples in a large stockpot, adding about an inch of water to the pan to prevent sticking and burning (add more water during the cooking process if necessary). Cook the apples over medium heat until soft, stirring occasionally.
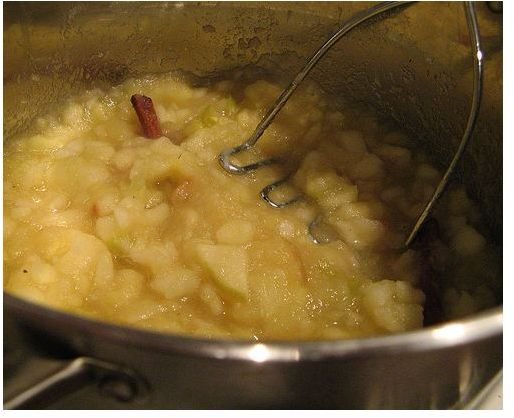
For a smooth consistency, puree the cooked apples in a food processor or a food mill. For a chunky consistency, use a potato masher. Return the applesauce to the stockpot and add sugar if desired. Bring the sauce to a simmer.
Step 3. Process the Applesauce
To prepare for processing, bring the 2-piece canning lids to a simmer in a small saucepan. Turn heat off and keep warm. Fill your water bath canner half of water and bring to a boil. Bring a teakettle of water to a boil to add to your canner, if necessary.
Using a funnel and ladle, fill warm canning jars with hot applesauce one at a time, leaving 1/2 inch headspace. Remove any trapped air bubbles with a rubber spatula. Wipe the jar rim with a clean, damp towel or paper towel after filling. Place a warm flat jar lid on the jar, followed by a screw band. Turn the screw band to tighten the lid, but do not overtighten. Place each jar in the elevated rack of your water bath canner as it is filled.
Once all jars are filled and in the canner, lower the elevated rack. If the water does not cover the jars by 1 -2 inches, top off the canner with additional boiling water. Place the lid on the canner and bring to a full boil. Begin timing the processing time of 20 minutes for pints and quarts.
After 20 minutes, turn the heat off, remove the lid, and let the canner rest for 10 minutes. Lift the elevated rack and move jars to a towel-lined countertop to cool. Once jars are completely cool, check the lids for a good seal. Remove the screw bands and check that the center of each lid is pressed down. If you can press the center of the lid down the jar is not sealed and should be refrigerated and eaten within a few days.
For additional information on water bath canning, see this Introduction to Home Canning or visit the National Center for Home Food Preservation .
photos courtesy flickr.com creative commons license:
https://www.flickr.com/photos/morecoffeeplease/3748024472/


