How to Make Log Furniture: Rustic Chair
Making a simple piece of log furniture will require a few special tools, a little bit of time and a comfortable work table. The short list of things you will need for shaping rough cut pieces of lumber is as follows; an axe, a draw knife, electric drill with a tenon cutter, a vice, wood glue, a rubber mallet, sand paper and varnish.
This step by step guide will teach you how to make a traditional rustic log chair. The same methods will be able to be used when making a table, bar stool or even a king size bed frame. The basic tenant of simple log furniture is the use of tenons. Tenons are conical or cylindrical end pegs that are carved directly out of the intact lumber. These tenons are fitted into holes drilled into the receiving end of the joint and secured with wood glue.
Prepping the Wood
The initial selection of rough pieces of timber for you chair should result in;
- four 25 inch long and 3 inches in diameter leg pieces
- five 19 inch long 1 ½ inch diameter pieces for the backing
- a one inch thick piece that is at least 18 inches in diameter
- a top piece that is 18 inches long and at least 4 inches in diameter that follows the curvature of your inch thick seat piece
These pieces should be rough cut to these lengths before you sit down to work on the tenons. The rough cutting can be done on site with a circular saw or table saw set-up.
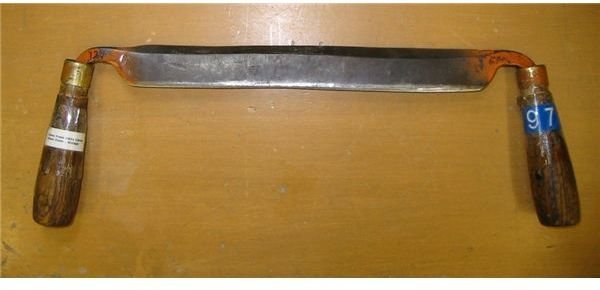
Once you have your pieces rough cut you can begin the process of skinning them. To remove the bark from your rough cut timber clamp a piece into the vice and use a draw knife to skim off the bark. A draw knife is a specialty knife with handles on both sides that allow you to pull the blade toward you can remove thin layers of material. You will need to turn the piece several times to peel away all of the bark. All pieces of rough timber that are under six inches in diameter can be handled in this way. To remove the bark from the seat portion you’ll have to chip it off with an axe. Secure the piece in the vice so that the bark is in a vertical position. Chop off the bark by making a strong chop and prying it away from the edge. Once the initial entry cut is made you’ll be able to remove the piece from the vice and pry off the entire bark by wiggling the axe head between the bark and wood.
Making Tenons
Tenons are simply pegs carved at the end of a piece of wood that are inserted into a hole in another piece. These tenons can be of any shape although round, square and triangular are the most common. I use a special tenon cutting tool for this job. It is basically a drill attachment that works like a router. It clamps down around the end of your stripped timber and cuts layers off the outer surface like a router. These tools can be set to different sizes to accommodate different tenon needs. The tool I use can cut tenons in pieces of wood up to six inches in diameter.
Take each of your 25 inch stripped wood pieces and use the tenon cutter to create a two inch in diameter ½ inch long tenon at one end of each. Adjust your tenon cutter to handle the 19 inch pieces next. Make tenons on both ends of these pieces that are ¾ in diameter and ½ inch long. These are all of the tenons you will need to make.
Drilling Out the Tenon Holes
Your tenons need to fit snugly into the tenon holes to make sure the finished piece will be sturdy and strong. Mark off four leg holes on the bottom side of your seating piece (18 inches in diameter). To find the points for your tenon holes draw a set of perpendicular lines through the center of the seat. The holes should be set one inch in from the edge of the seat one each line. Drill out a ½ inch hole at each of these points.
On the opposite side of the seat mark out five holes along the back edge of the seat from one leg hole to another. Evenly distribute these and drill a ¾ inch wide ½ inch deep hole in each place. Using this as a template, make matching holes in the topper piece.
Assembly of Log Furniture Chairs
Once all of your tenons and tenon holes are cut the next step is sanding down the pieces to prepare them for assembly. Use a fairly rough grit (#80) to sand with initially. Then do a polishing sand with a smooth grit paper. Once the sanding is done wipe the pieces with a damp cloth to remove any lingering sawdust.
Put a dab of wood glue in the leg holes and insert the tenonned ends of the legs. They will be tight. Pound them into place with a rubber mallet. Let these pieces sit for at least an hour before flipping the piece to insert the backing.
Once the seat is flipped over dab wood glue in each of the backing holes on the seat. Insert the backing poles into the tenon holes. Tap them in tightly with a mallet. Dab a bit of wood glue on the top tenons and slip the topper on. Pound the topper down onto the tenons. Let the entire piece sit overnight.
Check the stability of the seat by sitting in it and seeing if it needs to be leveled. If it does, adjust the length of the legs by sanding or cutting them down. Once your chair is complete, use a liberal coat of varnish to keep the wood from drying out and cracking due to weathering.
Now that you have learned how to make log furniture you’ll probably find yourself putting together an entire rustic set of chairs and tables for your backyard or deck.
References
All information on this page is derived from author experience in building rustic type furniture.
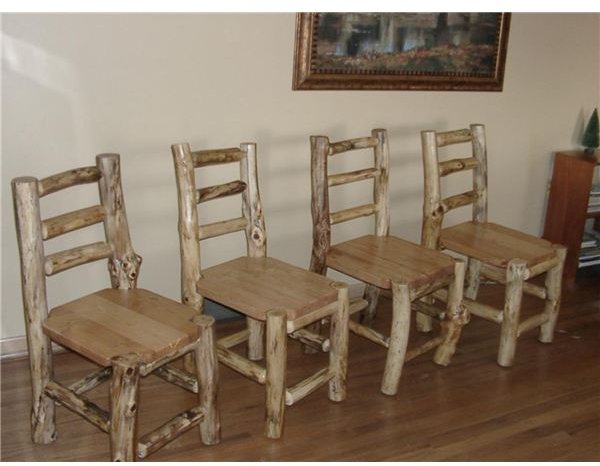
Image of chairs courtesy of Huxman Furniture
Image of Drawknife couresty of THE GROSSE POINTE ROTARY CLUB and Public Library.