Review of Uniblue Registry Booster 2009 – Registry Cleaning and Defragging Utility
Uniblue Registry Booster 2009
Windows registry cleaners, in general, are a hot topic for debate in many technical circles. Some claim that these products have the potential to do more harm than good, especially if you happen to download and install one from a less than reputable source. Others swear by these applications and insist that they improve the speed and efficiency of Windows PCs. However, both groups do agree on one fact – if you are going to use software of this nature, make sure that you’re using a program with a solid reputation.
Uniblue is a well-known name in the world of PC performance utilities, and Registry Booster 2009 is the company’s latest release of its registry optimization software. This application performs a deep scan of the Windows registry, looking for conflicts as well as unused and corrupted entries. Once the scan is complete, you’ll be given the opportunity to perform all recommended repairs or pick and choose as you see fit. We’ll talk a little more about this option later in our review, but first let’s turn our attention to the actual installation of the software.
Installation and Setup (5 out of 5)
The installation of Registry Booster 2009 was typical of most Windows software these days – click Next several times, click Finish, and you’re done. No problems were encountered during this process on several different machines, and general setup went as expected. However, for the software to run, your PC should meet the following system requirements.
- Intel Pentium 3 500Mhz or equivalent processor (Pentium 4 1Ghz or equivalent recommended)
- 256 MB RAM (512 MB RAM recommended)
- 100 MB free hard disk space (200 MB free space recommended)
- Graphics mode 1024 x 768 true color (highest 32-bit)
- Internet Explorer 5.5 or higher (Internet Explorer 6 or higher recommended)
- Microsoft Windows XP/Vista (32-bit)
Note that, at this time, Registry Booster 2009 is not compatible with 64-bit operating systems.
Ease of Use (5 out of 5)
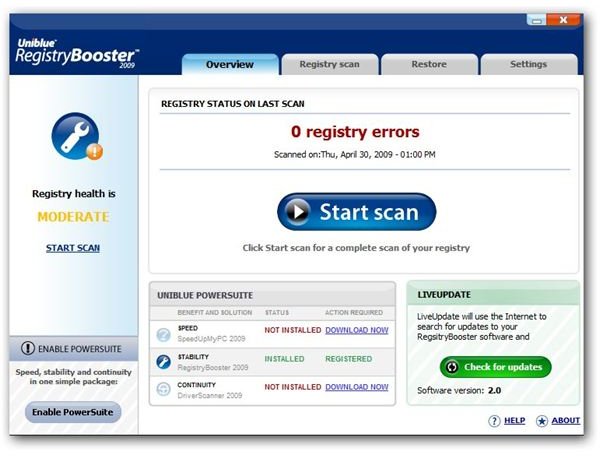
The user interface of Registry Booster 2009 is quite intuitive and easy to navigate. When you first open the application, you’ll be met with a startup screen informing you of the last date and time (if any) that your registry was scanned and some information about that event. To perform a new scan, simply click the large Start scan button as shown in the screenshot below. (Click any image for a larger view.)
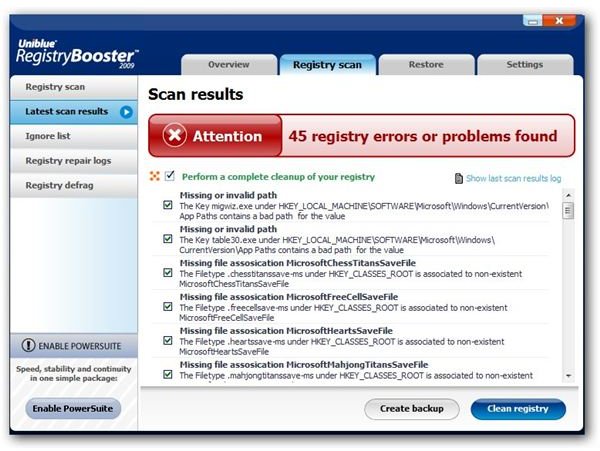
Once the scan is complete, a list of recommended repairs will be listed in the Registry scan tab of the application under Latest scan results. Here, you can choose to accept all recommendations by checking a single box or go through the list, one by one, and decide which changes you would like to make. You also have the option to create a backup of the registry before any changes are made. Always take advantage of this backup option – the process only takes a few minutes, and it can save you a lot of problems later if you do accidentally delete something critical. Don’t worry – if you forget to click the backup button, you’ll be reminded again of this option before any repairs are made to the registry.
In addition to the Scan option, Registry Booster 2009 also has a Registry defrag utility that can be accessed in the same tab of the application and run with just the click of a button. If you’ve made a number of changes to your registry, whether through cleaning with Registry Booster’s scan or simply through several install/uninstall procedures, this utility alone may result in quite a performance boost, especially if your PC is running with minimum RAM requirements.
Continue on to the next page for the conclusion of our review of Uniblue Registry Booster 2009.
Performance (5 out of 5)
I tested Registry Booster 2009 on both XP and Vista operating systems, obtaining very positive results in all cases. The quick option of applying the complete list of repair recommendations and then following up that action with the registry defrag utility took anywhere from 3 to 10 minutes, depending on the PC involved. It’s possible that it could take more time than this on machines with a larger number of registry issues.
One of the machines that I used to test Registry Booster 2009 was a five year old laptop running Windows XP with 512 MB of RAM. This laptop has been so slow and unresponsive that I’ve been considering either scrapping it or wiping the hard drive and starting fresh with some version of Linux. However, using Registry Booster in conjunction with SpeedUpMyPC 2009 made such a huge difference in that machine’s performance that I’m pretty happy with it just the way it is now, and I don’t plan on making any of the changes that I had considered before.
Price to Value (4 out of 5)
Uniblue is currently offering Registry Booster 2009 for $29.95. This is a typical price for utility software of this nature, even for those products that don’t quite do as they claim. Considering how easy Registry Booster is to use and how well it works, this is a very fair price – especially if it’s able to save you the price of a new computer or fees paid to a technical specialist to clean the registry for you.
Overall Rating (5 out of 5)
If you’re looking for a way to extend the life of an older PC or you’re just trying to squeeze a bit more speed out of a newer one, Uniblue Registry Booster 2009 is worth the investment. Even if you’re savvy enough to edit your Windows registry manually, it can take a considerable amount of time to weed through all of the information stored there. This application can save you that time by scanning and cleaning the registry in just a few minutes. If you’re not entirely comfortable editing the registry yourself (and with good reason, most people aren’t), you definitely should go with a third-party utility for this task, but only one with a solid reputation and a proven track record like Registry Booster. Now, the only thing I’m waiting for is Uniblue to come out with a similar tool for 64-bit systems. I’m still keeping my fingers crossed on that one.