The chassis intrusion detection is a very useful feature that alerts you whenever your computer chassis was opened. Maybe your computer was handled by an unauthorized person for malicious purposes. However, if you don’t want this feature, here is how to turn it off.
Chassis Intrusion Detection
Generally, personal computers have several security features and one of them is called “Chassis intrusion detection”. The purpose of this feature is to detect the removal of the computer chassis from its place and alert you of this incident so that you may check whether your hardware is still there, especially the hard disk that contains all your data.
The chassis intrusion detection feature is very useful in large organizations where you can’t be sure whether your PC is safe from tinkering by unauthorized people. Chassis intrusion detection makes sure that you know your PC was handled by someone as soon as possible.
However, there are times when you simply don’t need this security feature to be enabled on your computer. Say, you’re at home, where there is absolutely no chance of anybody touching your PC for malicious purposes. Then, this security feature becomes a nuisance whenever you will open your computer chassis for hardware replacement or for any other reason. The feature will show you a chassis opening warning message every time you will start your computer so you may want to disable so that it won’t disturb you again.
Further in the article, I will outline the steps you will need to take to disable this feature. Please note that these steps are exactly applicable on Dell PCs, but if you have any other brand of computer, there will be a slight variation in the following steps.
Turn Off Chassis Intrusion Detection Error
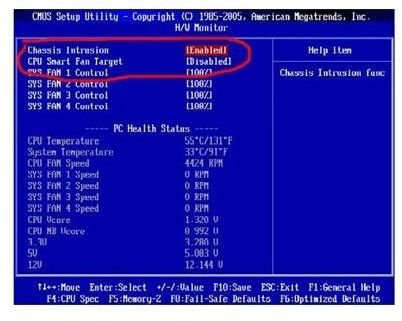
First, go to system setup. The procedure for that is: Restart your PC or switch it on, and when this message appears “Press
Enter Setup”, press the F2 key immediately. This will lead to the system setup. If you miss pressing the F2 key at the right time, then no worries. All you have to do is to wait a while, and restart your computer again. Once you enter the setup, go down to the System Security option. Do this by moving down the cursor with the down arrow key, and press Enter when you reach the System Security menu. In the System Security popup menu, move the cursor down to Chassis Intrusion setting and press Enter. Now you have to select an option setting. There are three (3) options:
- Enabled: This enables the chassis intrusion detection so that whenever your computer will detect that the chassis was removed, you will give an alert message during the next system boot up and after Windows startup . Now your PC had this option enabled, which is why you got the alert message during boot up. The alert message in Dell PCs appears like this: ‘Alert! Cover was previously removed.’
- Enabled-Silent: This is a default option and changes the setting to ‘Detected’ whenever the computer is opened. But the difference with ‘Enabled’ option is that this time, no alert message will appear during the computer boot up.
- Disabled: This disables the setting and no alert message is displayed when the system boots up.
If you just do not want this feature, you can simply change the setting to Disabled. To do so, simply press the left or right arrow keys to change the setting to Disabled. When it shows ‘Disabled’, your job is done.
Remember, before you exit the setup; make sure you save the setup changes. Once done, you can exit the setup with no worries about getting the chassis intrusion alert messages again.
Image Credit: www.fixya.com


