Microsoft Office 2010 Tips, Hints and Tutorials
Overview
The Beta version of Microsoft Office 2010 was made available in November of 2009, with a June 15, 2010 release date for all editions of the full version. Whether you have used it for a while now, are considering the purchase of one or more programs or fall somewhere in between, there are many Microsoft Office 2010 tips from which you can benefit. Learn what you will need to start using Microsoft Office 2010 and some of the exciting new features you can try.
Getting Started
Before you purchase a Microsoft Office 2010 suite, take the time to learn about the different editions available. Unlike Microsoft Office 2007, which offered eight unique editions, there are four Office 2010 suites from which you can choose. Each suite includes a different group of applications and corresponding price tag so you can base your decision on your needs as well as your budget.
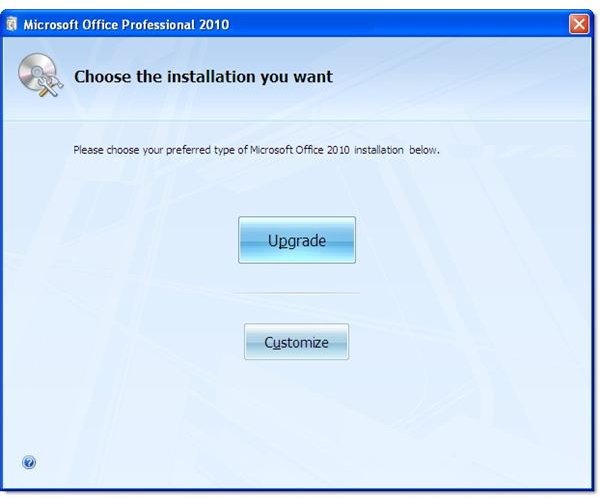
When you are ready to install Office 2010 on your computer, how you do so depends on whether you are installing Office for the first time or are upgrading to Office 2010 from a previous version. When you install the software, you will have the option to upgrade or perform a custom installation. If you would like to retain Office 2003 or 2007 and use Office 2010 as well, choose the Custom option, as this allows the suites to run parallel to one another. One important tip is that multiple versions of Outlook cannot co-exist on a system, so if you select this option your previous version of Outlook will be replaced by Outlook 2010.
Features
One of the best Microsoft Office 2010 tips is to find out about and take advantage of the new features. There are features that apply to all of the programs in the Office 2010 suite, such as the File tab that replaces the Office Button found in Office 2007. Clicking the File tab takes you to what is called the Backstage View. This view provides quick access to settings, recent files and other features.
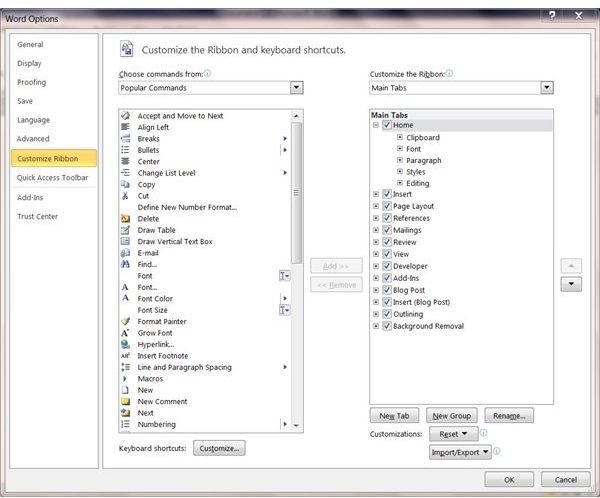
Another feature that is sure to be appreciated by users who found the Office 2007 frustrating or limiting is that you can customize the ribbon in Microsoft Office 2010 applications. From the Options menu found in Backstage View, you can add tabs to the ribbon, create groups and even rename tabs on the ribbon.
Some features made available with Office 2007 have become more powerful and versatile in Office 2010. For instance, the ability to save as PDF was available after you manually installed an add-in. In Office 2010, this capability is built-in and available in several forms. You can select PDF as the file type in the Save As dialog box. You can go to Share from the Backstage View and create a PDF version of your file. You can even send a PDF version as an email attachment directly from the Share menu, bypassing the need to create a PDF version first if you don’t need it on your computer.
Programs
If you are comfortable using the 2007 versions of Microsoft Office applications, upgrading to Office 2010 programs should be refreshingly simple for you. Most of the ribbon commands are in the same location, and with the ability to customize the ribbon you can tailor it to suit your needs even more.While there are some new file formats in Office 2010, most of the familiar ones, such as .doc and .docx still apply. You can also work in compatibility mode, which allows you to work on files created in older versions of the program and share files with others who are using previous versions.
Individual Microsoft 2010 programs give you some exciting and fun new features, as well. For instance, Outlook 2010 has a new feature called Quick Steps. There are predefined, built-in steps that automat the process of performing specific, common actions. You can create custom Quick Steps as well, enabling you to create and modify them to perform actions that you often require.
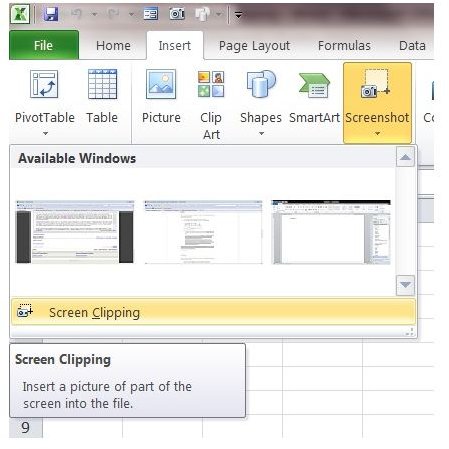
Another feature found in many Microsoft Office 2010 programs, such as Word, Excel and PowerPoint is the screen clipping feature. To use this feature, go to the Insert tab and click Screenshot. Choose Screen Clipping and your pointer becomes a cross. Drag your mouse over the part of the screen you want to capture. The screenshot is inserted into the file. If you have more than one window open, select the window from which you want to clip before you click Screen Clipping. After you have inserted the screen clipping, go to the Picture Tools tab to edit the image.
Other Office 2010 Tips and Resources
At first, you may have some trouble finding resources, such as Microsoft Office 2010 templates. As the Office 2010 suite becomes more commonly used, however, helpful resources such as templates, tutorials and application tricks and tips will be much more abundant and easier to find.
In addition, you can look forward to using Microsoft Office 2010 online, if you are not already doing so. Part of the Office 2010 rollout includes Microsoft Office 2010 web apps, making your favorite Office programs accessible to you no matter where you go!