As per the Microsoft website, you can use the upgrade disk to install Windows 7 on your Windows 2000 computer. However, there is a catch. You have to go for a “custom” upgrade. This article discusses upgrading from Windows 2000 to Windows 7 (applies to XP as well).
Upgrading from Windows 2000 to Windows 7 – An Overview
If you are upgrading from Windows 2000 to Windows 7 it is always better to go for a clean install. Though you can use the Windows 7 upgrade disk to install Windows 7, you will still lose all device drivers and programs. You also lose My Documents, Desktop, and My Favorites even though you are performing an upgrade. I can not see any specific reason for upgrading from Windows 2000 to Windows 7; you still have to install all the device drivers and the programs you need – making it almost equivalent to a clean installation.
The primary reason why Microsoft offers upgrading from Windows 2000 to Windows 7 is to get more customers: the Windows 7 Upgrade disk comes at a little lower cost than the regular one.
Before you install Windows 7 using the upgrade method, here are some points you should know:
- You get a single license even though the disk contains both 64-bit and 32-bit versions. This means you can either install the 32-bit version or the 64-bit version but not both. You may however, use the disk later to upgrade from 32-bit to 64.
- If you wish to install Windows 7 64-bit, upgrading is not possible from Windows 2000 as it never supported 64-bit processors.
- If you are intending to use a computer with an old motherboard having more than 2GB of RAM, it is always better to upgrade with only 2GB RAM (the new OS may not recognize it). After upgrading to Windows 7, add the remaining RAM. You may need to flash your BIOS before Windows 7 recognizes extra RAM on older motherboards.
- If creating a multi boot, you may lose XP. Please read this Bright Hub article on how to multi boot Windows 7 .
Before installing Windows 7, you may also want to check whether your computer will be able to support Windows 7. Windows 7 Advisor gives you a report on what hardware and programs are compatible with Windows 7 and what needs to be changed.
Now that you have all the required information, let us go on with explanation of upgrading from Windows 2000 to Windows 7!
Upgrading from Windows 2000 to Windows 7 – Setting up Windows 7
Before you proceed with upgrading from Windows 2007 to Windows 7, you need to back up all of your data. You can use any of your favorite backup programs or do a simple copy-paste.
The Windows Upgrade CD also contains software for you that automatically determines and backs up your data to any removable drive or a separate partition.
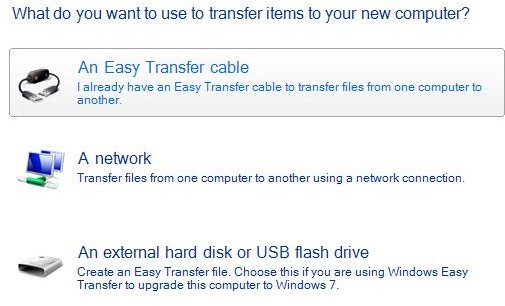
To use the Windows 7 Wizard, open the installation DVD and browse to the folder labeled Support. Double click on migsetup.exe to launch the Windows Easy Transfer tool (Fig 1). Once you tell the Wizard about what method you wish to use for backup, it will automatically detect files for backup (fig 2) and save them to the specified destination.
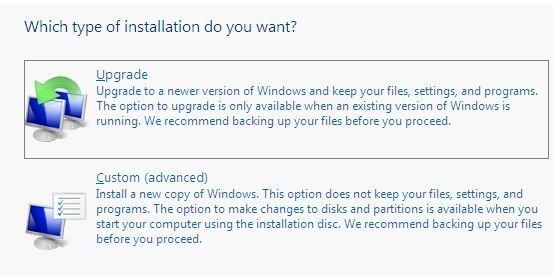
Once you are done with the backup, put the Windows 7 Installation Disk into your DVD Drive and reboot. While rebooting, select the Boot from CD option. The DVD presents two options: Upgrade and Custom (Fig 3). Select the Custom option. Choosing the first option will abort the installation after running for a while. Wait and follow the prompts until you get the new operating system.
Once done, install an antivirus and a firewall and connect to the Internet. Download Windows Updates and check for latest versions of device drivers. There are high chances that you will find better device drivers than those shipped.
After upgrading from Windows 2000 to Windows 7 and updating Windows, you will have to install the device drivers and programs again. Restore the backup.
TIP: To save this state of HDD, I suggest you use disk imaging software to save a Volume Shadow copy so that you do not have to undergo the process again. If you do not have any, I recommend the FREE Macrium Reflect VSS based Disk Imaging Software with Rescue Disk .
Image References