How to View Hidden Files in Windows 7 and How to Unhide Individual Files

Where Are My Files?
By default, Windows 7 will not show any file or folder that has been marked as hidden. Most of the time, this isn’t too much of a problem since files should generally only be marked with the “hidden” attribute if they’re important system or software files that should rarely (if ever) be touched. However, sometimes it is necessary to view or modify these files, and you can’t do that if you can’t find them.
Another scenario sometimes arises when a file or folder is marked as hidden on accident. Or, it’s even possible that you hid a certain file on purpose because you didn’t want other users to be able to see it so easily.
Whatever the reason, if you’re looking for a file and can’t find it, it’s quite possible that it’s been marked as hidden. But, it’s really not too hard to modify the default settings in Windows 7 so that you can view these hidden files, no matter what they are. The steps in the next section will walk you through that process.
How to View Hidden Files in Windows 7
Step 1: First, click on the Start button, and then open the Control Panel. Make sure that Category has been selected in the View by drop down box, as shown in the screen shot below. (Click any image in this guide for a larger view.)
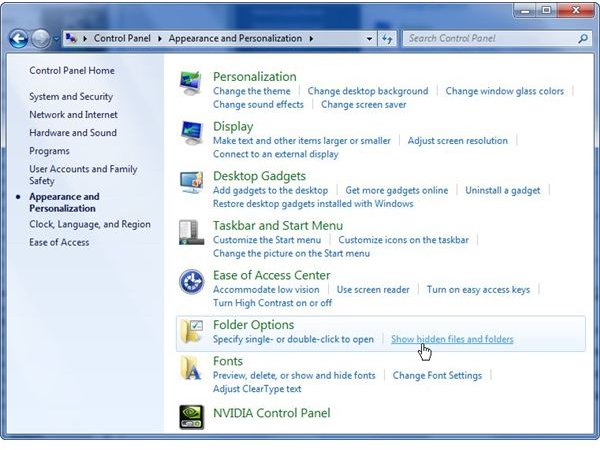
Step 2: Next, click on the Appearance and Personalization category.
Step 3: Now, on the new window that appears with appearance and personalization options, look under the heading Folder Options and click on the link labeled Show hidden files and folders.
Step 4: A new, smaller Folder Options window should now be open. Click on the radio button next to Show hidden files, folders, and drives.
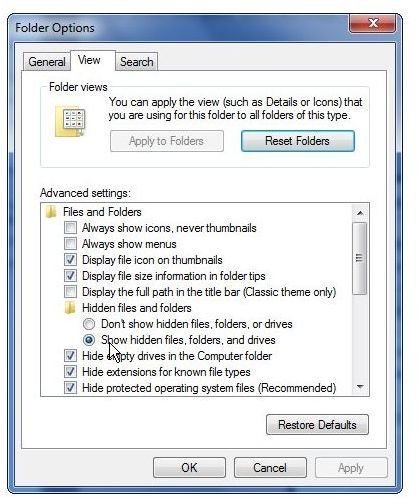
While you’re here, take a quick look at the other options available and see if there is anything else that you want to change. For example, you may want to also uncheck the box next to Hide extensions for known file types if you want to see the full name of each file when browsing through your computer’s folders.
When done, click the Apply button (if it isn’t grayed out) and then OK to exit.
“Unhiding” an Individual File
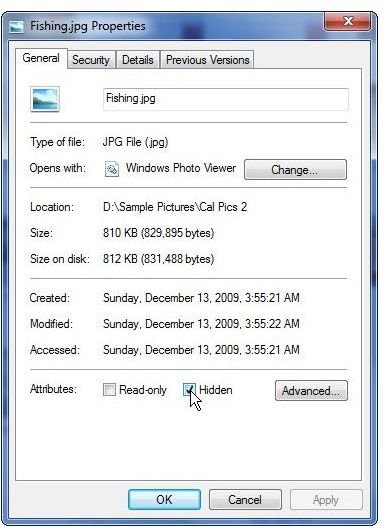
Once you find the hidden file that you’re looking for, you may want to “unhide” it so that you can view it even if the Show hidden files option is turned off again. To do so, right-click on that file and select Properties. If the file has a check mark in the box next to Hidden, you won’t be able to view it unless you’ve enabled the Show hidden files option detailed in the previous section.
To unhide this file, simply click on the check mark and it will disappear. Then click the Apply button and OK to exit the Properties dialog box.
Additional Resources
How to Change Sleep State Settings in Windows 7 – Is your computer going to sleep at all the wrong times or having a hard time recovering from sleep state. This guide explains how to modify the sleep settings in Windows 7 so you can either change how long your PC waits before going to sleep or disable the function altogether. It also explains how to turn off the option that requires you to enter your password when the computer comes out of sleep mode.
Top 5 Free Email Programs for Windows 7 – Despite what Microsoft would like you to believe, Windows Live Mail isn’t the only choice for a Windows 7 email program. There are several other excellent options.
Top 10 Photo Viewers for Windows 7 – This list takes a look at several top photo viewers for Windows 7 that are excellent alternative to Windows Live Photo Gallery. Many of them are even free.