How to Partition a Disk in Windows 7
Using Windows 7’s built-in Disk Management tool, you can easily create and format a partition on any hard disk in your computer. However, there are some decisions you must make along the way.
You must be careful because partitioning and formatting a hard drive or part of a hard drive will destroy any data on it. Essentially, partitioning a hard disk means you are splitting the drive up into smaller, more manageable pieces and erasing all information contained on them. Read on to learn how to create a hard disk partition in Windows 7 and format it for use using either NTFS or FAT32 file formats.
Creating a Partition in Windows 7
To partition a hard disk in Windows 7, you must be logged in as an administrator. After you log in using an account with administrative privileges, begin by clicking on Start and right clicking on My Computer. Choose Manage from the menu that opens. You are now looking at the Computer Management window.
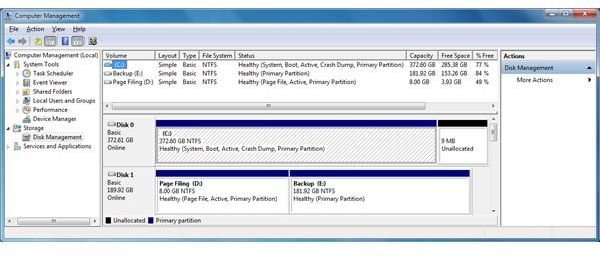
In the left hand pane in the Computer Management window, expand Storage and click on Disk Management. Windows 7 will automatically generate a visual representation of your drives and the partitions they contain for each drive in your computer. (Click images to enlarge.)
Right click on any unallocated region of one of your hard drives and chose New Simple Volume. This opens the New Simple Volume Wizard that walks you through the rest of the process. Click on Next.
Here you have to make your first decision. You must decide how large of a partition you want to create in the unallocated space. Simply type in the size of the partition you wish to create. Notice that the default size is the entire size of the unallocated space. Also, notice that you need to specify the size of the partition in Megabytes (MB). When finished, click on Next.
The second decision you need to make is the letter that will represent the new volume you are about to create. Windows 7 recommends the next available letter on your computer but you can choose any available letter to represent the partition’s space. Don’t worry too much about what letter you choose because Windows 7 allows you change the letters of drives to anything you want. When finished making your decision, click Next.
Windows 7 now ask whether you want to format your new volume. If you don’t want to format the volume now, click Do Not Format This Volume and click Next.
If you do want to format the volume now, click Next when asked. You can choose to format your new volume with the default settings or change them to suit your particular needs. The one major choice you have to make is which file format you want to use to format your new volume.
NTFS is the default file format for Windows 7 and is the most secure and stable choice for this operating system. However, some people have a need to format a volume using the FAT32 file format. FAT32 is an older file format that is less secure and generally less efficient then NTFS.
However, if you share this drive with another operating system or want to have maximum cross-platform compatibility, FAT32 is the better choice. If you will only be using this new volume with Windows 7, NTFS is the best choice.
When you finish making your decisions, complete the format wizard and click OK. Windows 7 will now format your new volume according to the choices you made.
Conclusion
Creating a partition on your hard disk in Windows 7 is an easy procedure but you must make a few decisions along the way. Partitioning and formatting a drive destroys all of the data it contains so take care to backup all of your data before you do it.
Also, after you partition the drive, you must format it to ready it for use. After you make a few formatting decisions, you need only sit back and wait for Windows 7 to complete the formatting process. Then, you can use your new partition.