How to Set the My Computer Icon with Windows 7
Overview
Adding the “My Computer” icon to your desktop in Windows 7 is pretty straightforward. If you try to change the icon, you might encounter some confusion. Read on to learn how to create a “Computer” desktop icon, how to add “My Computer” to your taskbar and how to set the My Computer icon with Windows 7.
Add My Computer to the Windows 7 Desktop
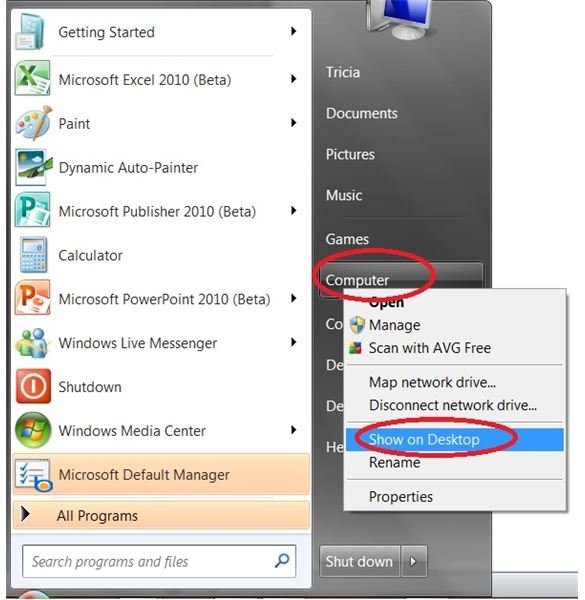
“My Computer” is simply named “Computer” in Windows 7. To set the My Computer icon on your Windows 7 desktop, click the Start button. Find Computer in the left side of the Start menu. Right-click Computer and select Show on Desktop. The Computer icon will now be visible on your Windows 7 desktop.
Add My Computer to the Windows 7 Taskbar
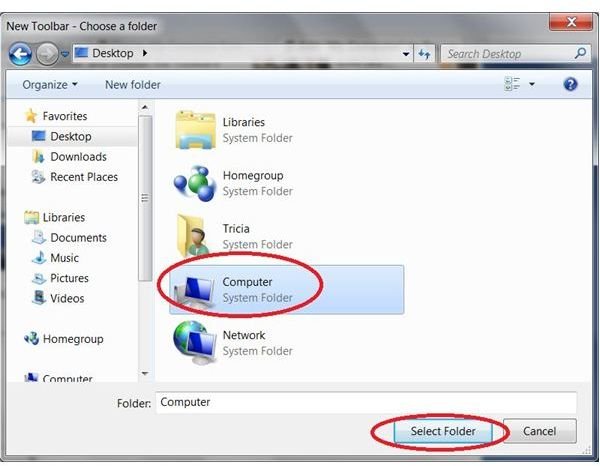
Another way to make the Computer folder readily available is by adding it to your Windows 7 taskbar. To do so, right-click any unused area on the taskbar. Point to Toolbars and select New Toolbar. The New Toolbar - Choose a Folder window will open. Select Computer from the main window or the left pane and click Select Folder. A Computer toolbar will display in the taskbar near the System Tray. Click on the double arrows to the right of Computer to access all of your computer drives.
How to Set the My Computer Icon with Windows 7
For most desktop shortcuts you can change the appearance by right-clicking the icon, selecting Properties and clicking the Change Icon button on the Shortcut tab of the dialog. If you tried to set the My Computer icon with Windows 7 in this manner, however, you quickly learned that it does not work. Changing the icon is not difficult, though, once you know where to look.'
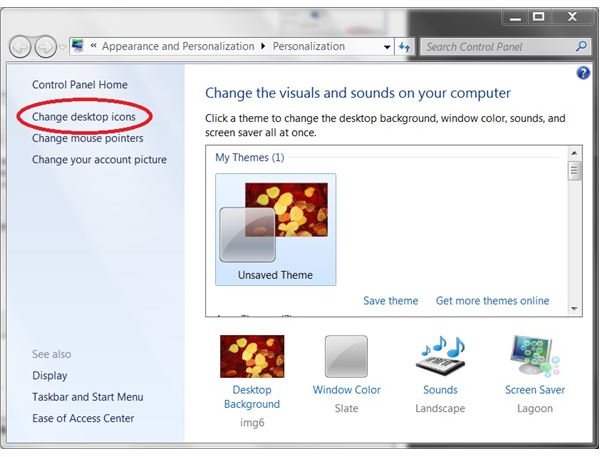
Right-click any blank area of your desktop (basically anywhere besides on an icon). Select Personalize. The Appearance and Personalization window will open. Click the Change Desktop Icons link in the left pane of the window. The Desktop Icon Settings dialog box will open.
Click the Computer icon in the main window of the dialog box and click Change Icon. The Change Icon dialog will open next. Find the icon you want to use instead of the default My Computer icon and click OK. Click Apply to save the changes. You can also change the icons for other desktop items here, such as your Recycle Bin or your Control Panel. If you change your mind, simply click the Restore Default button. When you are finished changing icons, click OK to close the dialog and then close the Appearance and Personalization window. The icon will be changed both on your desktop and in your Start menu.
Related Articles
Now that you know how to set the My Computer icon with Windows 7, learn how to do even more by reading Bright Hub articles such as Windows Movie Maker in Windows 7 and How to Password Protect Folders in Windows 7.