How to Burn Downloaded Movie Files to DVD
DVDFlick is a free, open-source Windows application able to convert downloaded DivX, Xvid, and other popular formats to a DVD image file. This image may then be burned to DVD for playback on your PC or in a standard DVD player on your full-sized TV. Although the application is free, if you find the software useful, you should consider making a donation to the project.
DVDFlick can be downloaded here.
The version we grabbed was 1.3.0.7. This was approximately a 16 megabyte download.
In this step-through, we’ll look at converting a sample movie file found on the internet. Ninety-minute movies are often found encoded (or more accurately, transcoded) to files that are about 700 to 1,200 megabytes, and thirty-minute shows are about 250 to 300 megabytes. Our objective here is to convert a 703 megabyte DivX-encoded .avi file to DVD format and then burn it to a DVD-R.
This movie probably originated from a DVD or VCR recording and was then converted to DivX format to reduce the file size for sharing or for local storage. This produced some diminishment in video and sound quality, and converting it back to DVD will further degrade the end result. Fortunately, DivX is very good at retaining the important parts of the original source, so our DVD should be adequate for watching on TV.
DVDFlick has features for more advanced DVD authoring like adding a commentary, menus, multiple titles on one DVD, and subtitles. These advanced capabilities are not hard to master, but here we’ll try to keep it simple.
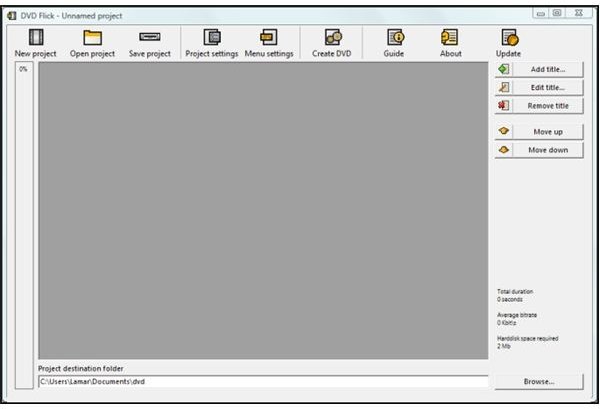
This is what the application looks like at first run. (Click for a larger image.)
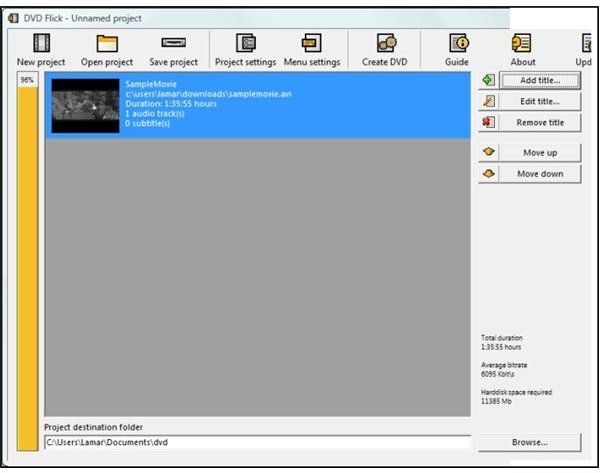
Starting out is really easy. Just drag and drop your movie file in .avi, .mpg, or any host of other file formats (find the full list here), directly onto the application’s center grey space. All the files that make up the resulting DVD are part of a DVDFlick “Project.” In this example, we added a movie called “SampleMovie.avi” by dragging it and dropping it. Here’s what it looked like.
The next step is to click the “Project Settings” button to bring up this dialog.
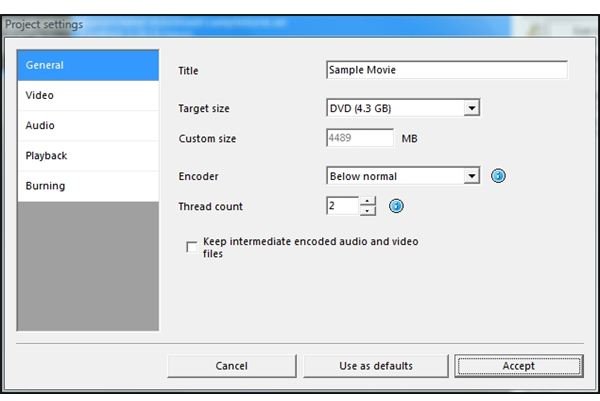
On the first tab, we imaginatively entered “Sample Movie” as the project title. Target size was left at 4.3 gigabytes, which is the standard “DVD-5” format commonly found in stores in the US.
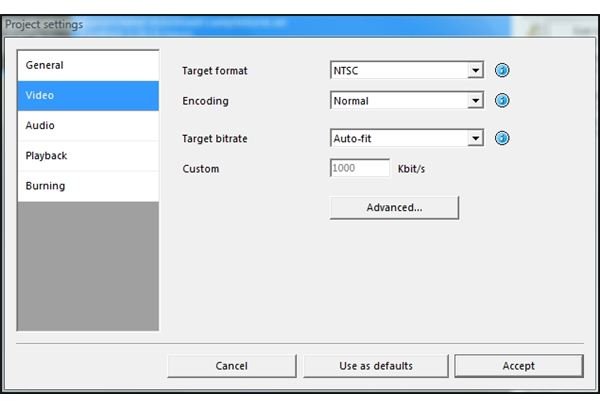
On the video tab, we left the target format as NTSC, which is used in DVD players in the Americas.
Finally, on the “Burning” tab, we checked “Burn project to disc” and entered a name for the disc itself. This is the disc label that will show up in Windows File Explorer when the disc is opened on a PC.
At this point, the summary section of DVDFlick’s main window showed
- Total duration: 1:35:55 hours
- Average bitrate: 6095 Kbits/s
- Harddisk space required 11,385 Mbs
We were now ready to try burning the disc. Clicking “Create DVD” brings up a dialog that says, “The project will be burnt to disc after it has finished encoding. Please sure there is a blank disc in the recorder drive you selected.” After another confirmation dialog, DVDFlick starts the encoding.
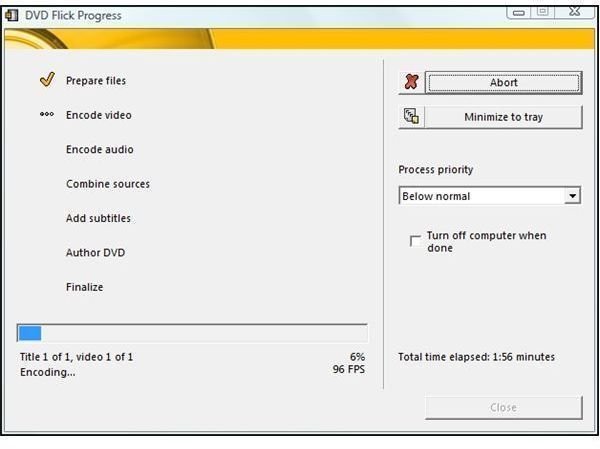
The steps involved are
- Prepare files
- Encode video
- Encode audio
- Combine sources
- Add subtitles
- Author DVD
- Finalize
DVDFlick ran for one hour, twelve minutes, and fifty-four seconds. After that, it started ImgBurn to “build” the DVD image (.iso file) from the video files (.vob files) that DVDFlick created. The actual burn lasted about nine minutes, and closing ImgBurn caused DVDFlick to return a “Finished” message.
So how did it work? Ejecting and reintroducing the DVD started Power DVD Deluxe on this system. Since no menu was selected, it launched right into the movie. Viewed on the PC and then in a conventional (cheap, durable) DVD player and television, we would estimate that the end result has about 80% of the quality of the original movie. The conversion rendered titles and faces very well, but backgrounds like walls, buildings, and sky made it evident that some extensive compression had taken place. This compression was presumably in the original encoding from the source (DVD or video tape) to DivX. This is understandable since this file started out as a DVD movie or VCR movie, was compressed down to about 700 MB, and then expanded back to a 4.7 GB DVD.
While certainly not of any better quality than the original DivX-encoded video, the quality was fine for viewing with the family VCR and getting the video file off of the PC and onto the television screen.
Note: DVDFlick works best with ImgBurn, which is a popular, free, light-weight DVD burner application. Although DVDFlick works automatically with ImgBurn to create the DVD, you can also choose to set up your Project to create the ISO DVD-image file and stop. Then you can use any compatible burning application (such as Nero Burning ROM) to create the DVD.
Images: Screen shots by the author