This article serves as a quick reference for users of MS Word 2007. Find out how to use shortcut keys and buttons to make your word processing tasks a cinch.
The Basics
By now, most of us know the basic shortcut keys for using Microsoft Word 2007 . These shortcuts can be real lifesavers when you are working in the software program. but in case you don’t here they are again:
- Creating A New Document (
+ ) - Open An Already Created Document (
+ ) - Save A Document (
+ ) - Print (
+ )
- To Undo a Mistake (
+ ) - To Close a Document (
+ ) - Cut (
+ ) - Copy (
+ ) - Paste (
+ ) - Redo or Repeat Last Action (
+ ) - Create Bold Text (
+ ) - Create Italicized Text (
+ ) - Underline Text (
+ ) - Align Text to the Left (
+ ) - Align Text to the Right (
+ ) - Justify Text (have text aligned on both sides) (
+ ) - Place Text in Center (
+ ) - Go to the Beginning of Your Document (
+ ) - Go to the End of Your Document (
+ ) - Find or Find and Replace (
+ ) - Change Font (
+ )
As you can already see, by familiarizing yourself with the different shortcuts in Microsoft Word, you can save yourself much time in the long run when creating documents.
More Word Shortcuts
There are some more Word Shortcuts that you should familiarize yourself with. Isn’t it nice to not always have to go to the mouse to get things done in your word processing program? Here are some more helpful shortcuts:
- Set a Hanging Indent (
+ ) - Set Indents (
+ ) - Select a word, sentence, or paragraph (
+ ) - Select the whole document (
+ ) - Go To (
+ ) - Create a Hyperlink (
+ ) - Create a Comment While Editing (
+ + ) - Use Bullets for List (
+ + ) - Add Endnote (
+ + ) - Add Footnote (
+ + ) - Single-Space Your Text (
+ <1>) - Double-Space Your Text (
+<2>) - 1.5 Line Spacing (
+ <5>) - Insert the Current Date (
+ + ) - Insert the Current Time (
+ + ) - Double Underline Selected Text (
+ + ) - Increase Text Size One Point (
+ <]>) - Decrease Text Size One Point (
+ <[>) - Create Subscript Text (
+ <=>) - Create Superscript Text (
+ <+>) - Apply or Remove Space Between Two Paragraphs (
+ <0>) - Delete the Previous Word (
+ ) - Delete the Next Word (
+ )
Now, armed with many shortcuts (there are more Microsoft Word shortcuts available on Microsoft’s website), you are ready to streamline your work processes in Microsoft Word 2007.
Creating Tables
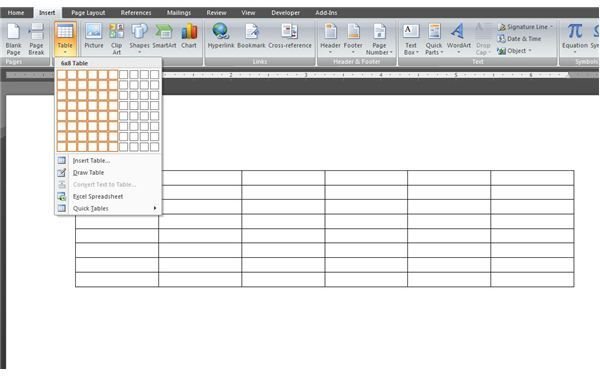
Now that you have streamlined your writing process, perhaps you will want to jazz up your documents by creating tables in Microsoft Word 2007 . The steps to adding a table to your document are:
- Go to the “Insert” ribbon
- Click “Table”
- Highlight the number of rows and columns you want your table to contain.
- Click
- Label your rows and columns.
Creating a Mail Merge
Finally, you may want to use MS Word 2007 to send out letters to individuals. This is called creating a mail merge . Simply put, the steps to creating a mail merge are as follows:
- Click “Mail Merge” on the navigation ribbon and click “Start Mail Merge.”
- Select the type of document to be created
- Click “Select Recipients” and choose who the mail merge will be addressed to
- Select the merge fields under “Write and Insert Fields”
- Create Your Document
- Preview the letters by clicking “Preview Results”
- Complete the Mail Merge by clicking “Finish & Merge.”
There you have it. You are ready to do just about anything using Microsoft Word.


