Can My Computer Run Windows 7 XP Mode? (How to Find Out)
Windows 7 XP Mode
“But what about our applications?” That question will concern many XP-only shops when they consider upgrading to Windows 7. Fortunately, Windows 7 is the first version of Windows that comes as standard with virtualization technology. It’s based on Microsoft’s previous Virtual PC (Hyper-V) for MS Server and makes use of AMD’s “AMD-V” capabilities, too. Most Intel-equipped PCs made in the last three years should also work with XP Mode.
Although most recent PCs and laptops should support XP Mode, virtualization may not be supported by, or enabled in, the BIOS. To confirm that a PC can run Windows 7 XP Mode, one needs to determine if the CPU is compatible and if the BIOS offers virtualization.
First, we should look at the BIOS, and then we can download a free CPU identification program from Intel or AMD to confirm the CPU’s support.
Enabling Virtualization in the BIOS
Since the specifics vary among different manufacturers, the following directions will be somewhat generic.
Update: After enabling virtualization in the BIOS and letting the machine reboot, turn it off again and let it remain off for a couple of minutes. This is to reset the processor.
On HP PCs or laptops press the Esc key during startup, and then press F10 to enter BIOS setup. Using the arrow keys to navigate, go to System Configuration and then highlight “Virtualization Technology.” Press Enter to get the options for the setting and select “Enabled.” Press F10 to save and exit, and then select “Y” for Yes. The system should then restart.
On Dell PCs or laptops, press the F12 key while the startup screen is displayed. Then select “BIOS Setup.” Using the arrow keys (or the mouse, if that works on your PC), find “Virtualization Support,” and select the (+) symbol to the left. Select “Enable Intel Virtualization Technology,” select “Apply” and then shut down the PC.
On a ThinkPad, press the blue ThinkVantage button during startup and press F1 to enter BIOS setup. (Be quick as it will continue booting if you don’t provide an input.) On the “BIOS Setup Utility” screen the highlight will already be on “Config,” so press Enter. Scroll down and select (press Enter) “CPU.” Use the arrow keys to move down to “Intel Virtualization Technology” and press Enter. Press down once to select “Enabled” and then press Enter. BIOS will inform you that “Changes have been saved,” so press Enter to select “Continue.” And that’s it. Press F10 to save and exit setup and select “Y” for Yes. The ThinkPad will then restart.
Confirming Hardware Support for XP Mode
Once Virtualization is enabled in BIOS, you can download a processor identification utility as further confirmation that your PC supports Windows 7 XP Mode. Note that each of these runs in Windows XP as well as Windows Vista. (In Vista, right-click the executable and select “Run as administrator.”)
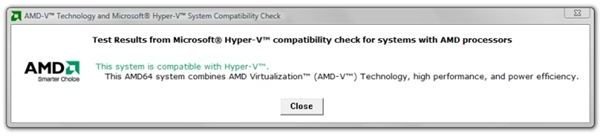
AMD calls their’s “AMD-V Hyper-V Compatibility Check Utility.” That link, by the way, is directly to download the zip file. Here’s what it looks like when run.
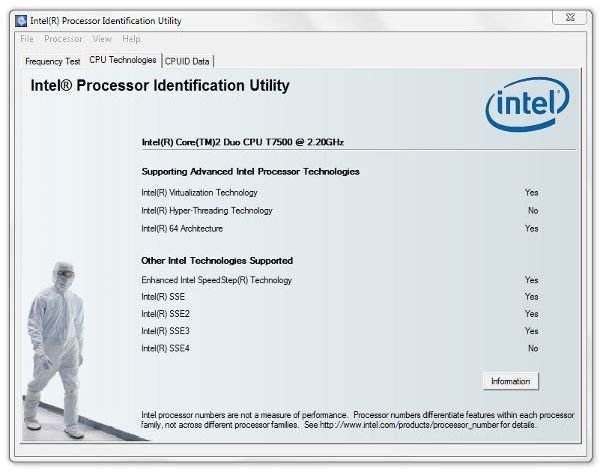
Intel calls their’s the “Processor Identification Utility.” That link is the first page where you can select the product. There are several more clicks involved to agree and download it. Here’s what it looks like when it runs.
Try Out XP Mode
Are you already running Windows 7 RC or RTM? If so, as this was written, you can download Windows XP Mode Release Candidate for Windows 7 and try it out. Remember that only the Professional, Enterprise, and Ultimate versions of Windows 7 support XP Mode!
Further Reading
How to Install XP Mode in Windows 7 - Windows XP Mode is a utility in Windows 7 Professional, Ultimate, and Enterprise that allows the user to run native Windows XP applications in a “virtual machine” on the Windows 7 desktop. Unlike other applications that allow such capability, XP Mode is designed to be easy to understand, use, and install. Here we’ll show you how it’s done.