If you want to get to the last document you worked on in Word you probably know that you can go to the File menu in Word 2003 or the Office Button in Word 2007 and find your recent documents there. However, here is an even quicker way to open the last document right from your desktop.
If there is a specific Word document that you would like to be able to access quickly from your desktop, you can make a shortcut for the document (or any other file or folder) in just a few simple steps.
Make a Shortcut of Any Word Document
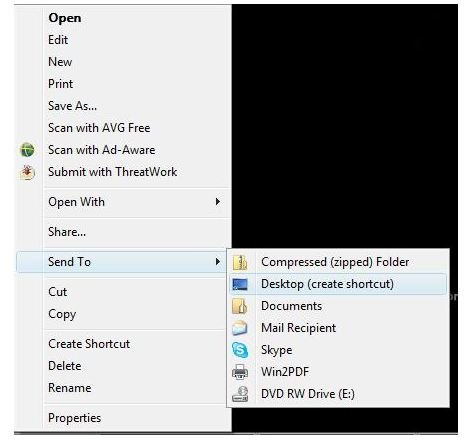
To make a desktop shortcut of a specific document (or other file), find it in My Documents or wherever you have it saved, but do not open the
file. Right-click the document, point to Send To and select Desktop (Create Shortcut). This will make a shortcut that, when you click on it from your desktop, will open that specific Word document. Now that you know how to make a shortcut to a specific Word document, read on to learn how to make a desktop shortcut that will open the last Word document you used, no matter what it is.
Make a Shortcut to Your Most Recent Word Document
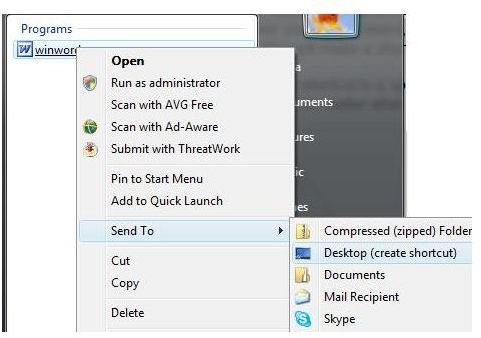
To make a shortcut to your most recent Word document, start by finding the winword.exe file on your computer. You can do this in Windows XP by going to the Start Menu and clicking on Search. Select All Files and Folders and type winword.exe into the All or Part of the File
Name box. Click the Search button to locate the file.
In Windows Vista, click the Start button and type winword.exe into the Start Search box. The winword.exe file should appear at the top of the programs list.
Do not click on or open the winword.exe file. Instead, right-click the file, point to Send To and select Desktop (Create Shortcut).Close the search window or exit the Start menu.
Head to your desktop to find a new Microsoft Word shortcut. This shortcut will not open a document. It will act just like any other Word icon and open MS Word with a new, blank document. That is, until you make a few changes to the shortcut’s properties!
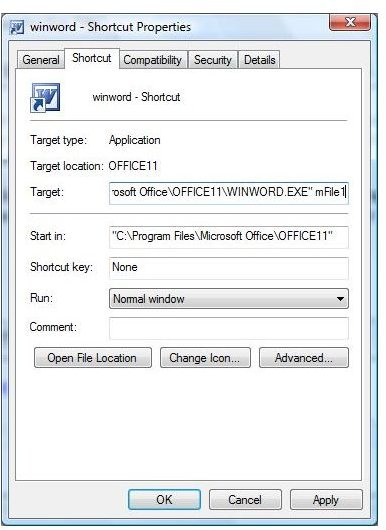
Right-click the new Microsoft Word shortcut and select Properties. The winword - Shortcut Properties dialog will open. Go to the Shortcut tab. Place your cursor at the end of the Target field. Enter one space after the file path listed in the field and then type in /mFile1.
Go to the General tab of the winword - Shortcut Properties dialog. Delete winword - Shortcut from the field next to the Word icon. Type in Most Recent Word Document or any name for the shortcut that makes sense to you.
Click on the Shortcut tab once more. Click the Change Icon button and select an icon for the shortcut to your most recent Word document. This will make it easier for you to quickly locate the correct shortcut, especially if you already have a shortcut to MS Word on your desktop. Click Apply to save the changes and OK to close the dialog.
Now when you click on the shortcut, Word will open with whatever document you last worked in. For more Word tips and tricks, check out the Bright Hub Microsoft Word Tips Collection .


