
How to capture analog video from an analog source such as a VHS player and turn it into a digital video within the Windows Movie Maker which is included with Vista.
From Analog to Digital in Windows
Before the advent of DVD, and the many advances in the quality and size of digital video formats, those of us who wanted to capture those special days such as weddings, vacations, or just our pets or children playing around resorted to what was available at the time: analog video. Maybe we used a VHS camcorder, or an 8mm one, the fact is that the video was captured in a format that loses quality over repeated viewings, is prone to be damaged by a faulty mechanism that may get the tape stuck, and that many people may not even have the proper playback device to watch it. We could always carry the VHS to our in-law’s place in order to show them some of our videos, but really, why not do better in this digital age?
In this article, I’ll show you how easy it is to take one of those treasured videos and convert it into a format that will not degrade in quality over time, will yield perfect copies every time you transfer it to a new device, and that will allow you to edit it easily in video applications. Then, well, you may do whatever you wish with it, and may even save some space as you slowly start getting rid of bulky collections of old VHS-C, VHS, and 8mm tapes.
Necessary Tools
I’m not going to lie here. If you want to convert your videos from an analog into a digital format, you will need the proper tools to do so. And not all of them are software applications. These are the tools that you will need for the job:
-
Analog Player: Simple enough. If your video comes from a VHS-C tape, then you will need a VHS-C camera with proper RCA video and audio outputs, or a VHS player with RCA audio and video outputs and a VHS-C to VHS converter. If the video is from an 8mm tape, then you will need an 8mm camera with RCA outputs.
Advertisement -
Digital Video Converter: This is an additional piece of hardware that you will need to acquire in order to capture the video. Basically, PC’s lack video inputs in order to receive the video and audio signals from a VHS or the like, so you will need this item in order to plug in your RCA cables from the analog source and route it to your PC. There are many such devices to choose from, from low end USB devices you will easily find at any local computer hardware store, to really high-end, specialized devices you may only acquire from specialty suppliers. You can even use a Mini DV camera if it has analog pass-through capabilities. Personally, I prefer Canopus devices as I’ve always managed to keep perfect video and audio sync when using them, but this will really depend on what you have available and your budget for the project.
-
Windows Movie Maker: Naturally, there are countless other software utilities you can use for this, but since this one’s free, and anyone using a modern version of Windows should have this, it’s the one I will use in this article.
Advertisement -
Analog Video: You need your analog video before you are able to convert it.
-
Storage Space: I mean in the Gigabytes. Many of them. Preferrably to a different hard drive than the one that houses your operating system. Digital video takes an awful lot of storage space, so be sure to provide it.
Advertisement
Windows Movie Maker is doing the Capture!
Ok, while I usually use another application to capture and edit my video, we can’t ignore that Windows Movie Maker is part of Windows, and thus much more likely to be available than any other application in the average Windows PC.
I’m assuming you have hooked the analog source’s output cables into the capture device, and hooked up the capture device to the PC, whether by USB or Firewire. So, just launch Windows Movie Maker and you will be a greeted by a window similar to this one:
Make sure that it’s set to “Import Media”, then click on the link that says “From digital camera”. You will then be greeted by the following window:
The window has a few options to help you decide how to handle the captured video and where to store it.
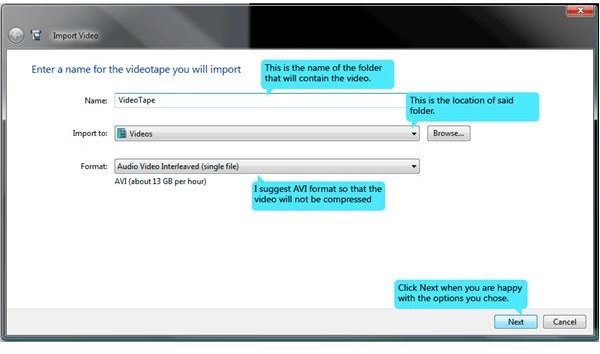
First, we have the “Name” field. The name that you type here is for a Folder that will store your video, not for the individual file that you will capture. The actual name of the captured file will be a date and time stamp related to when the capture took place. This is so that you can do multiple captures if you would rather grab bits and pieces rather than a full tape at once.
The “Import to” combo box is simply the location on your PC that will house the video Folder that you named in the previous field. By default, this is the Videos section found within your Documents. Of course, you can just click on the “Browse” button to look for a more specific location for this.
Finally, the “Format” combo box. Click on this one to choose the format that the captured video will be stored as. This is not meant to be a lesson on digital video formats and their pros and cons, but I’ll just say that my suggestion is to capture to an Audio Video Interleaved (which is the fancy name to the AVI extension) file, as this will be uncompressed and thus of the highest possible quality. You always want your source digital video to be of the highest possible quality available.
Once you’re happy with the selections, click on the “Next” button at the bottom to proceed. You’ll then be greeted by the following window:
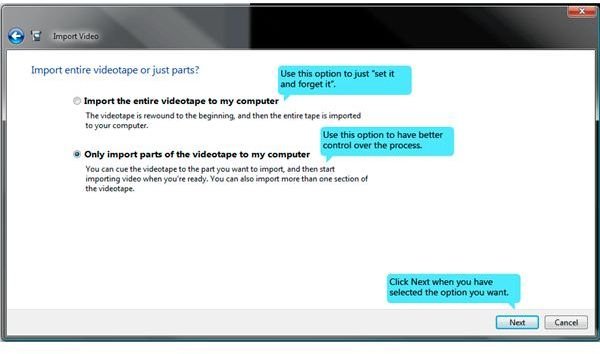
This is just asking us how we want to capture the video. Maybe you’re simply interested in letting the tape run until its done and then do all your editing and splicing within your preferred editing software. If that’s the case, just choose the first option, “Import the entire videotape to my computer.” The following window will have an option to set Windows Movie Maker to automatically stop after a certain amount of time has passed, so you don’t have to babysit the program. Just keep in mind that if you click this, Windows Movie Maker will start importing immediately after you click “Next,” so be sure to have everything ready by then.
The second option, “Only import parts of the videotape to my computer” affords a little more control to the proceedings, as when you click “Next”, the program will wait for you to actually tell it to begin capturing, and it’s more suited to capture sections of the tape than the first option in case that you don’t want the whole thing transferred to your hard drive. If you capture multiple sections, keep in mind that you will not be overwriting, nor appending to the previous capture file. You will simply create a new file to capture to, which is why the program asked for a name for the tape, you gave it a name that it assigned to a Folder rather than a file.
So, click next when you’re done to be greeted by the image we’ll be showing on the next page.
The Capture Operation
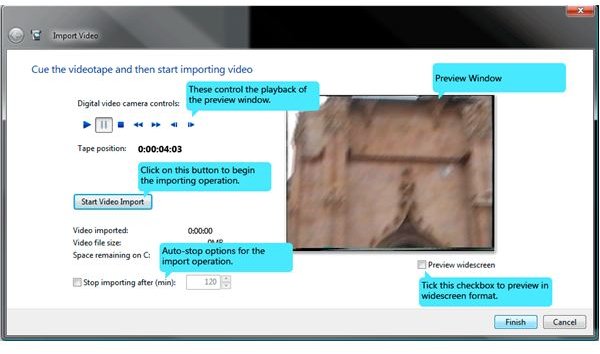
Some would call this the nitty-gritty of the import operation. This is where the action takes place after all. You’ve set your parameters and video options and you are ready to import.
If you chose to “Import the entire videotape to my computer,” then the preview is already playing, and Windows Movie Maker is capturing. If you haven’t hit Play on your source device, you’re just wasting precious storage space on nothing. Feel free to use the “Stop importing after (min):” option to set how long the video should be and forget about it as you do something else… or just watch it while it’s being imported. Windows Movie Maker will automatically stop importing after that amount of time has passed, or you run out of hard drive space. Capturing video takes a lot of storage space, so be sure to have that covered.
If you chose to “Only import parts of the video to my computer”, then the preview isn’t running, Windows Movie Maker isn’t capturing yet, and you are afforded the time to seek out the part of the video you really care to import.
Now, pay attention to the Preview Window and the “Digital Video Camera controls:”
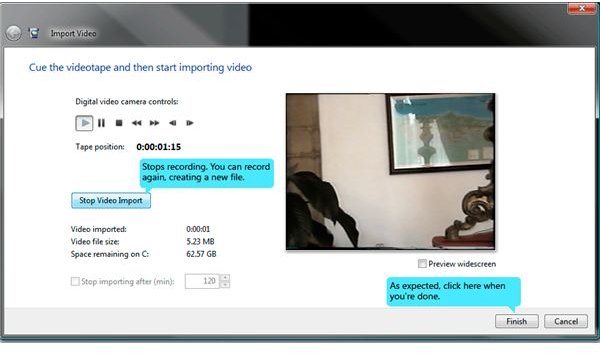
Windows isn’t actually controlling your analog device through this, but if you have hit Play on your VHS (of any other analog device hooked up via the capture device) and you see nothing on the preview window, it’s because you have not hit Play on these controls. They basically control the playback of the Preview Window. Make sure it’s playing before you begin capturing. It will also need to be playing as you seek within your video for the section where you want to begin capturing. Once ready, click to “Start Video Import” button to begin the operation. The “Start Video Import” button will turn into the “Stop Video Import” button then. You will want to click that when you’re done. Then, you can click on “Start Video Import” again if you wish to navigate to another point in the tape to begin capturing. When you’re done grabbing your clips, simply click on “Finish”.
That’s it! Have fun with your video!
Your video is now a digital file found inside the Folder where you pointed Windows Movie Maker to save it. Enjoy the benefits of your digital video, such as doing some easy edits (any software editing program is far more precise and easier to use than the old dual-vcr method with record-pause-record), being able to burn DVD’s, post in Youtube, etc. You can also copy digital video over and over and not have to worry about the quality decaying as you keep playing it, unlike with tapes. Of course, hard drives don’t live forever, and DVD’s won’t work if they’re scratched all over, so now that you have an easier to store video, be sure to also handle your videos and data responsibly and back up! A little advice from my own personal experience.


