Installing Windows 7 Quickly & Easily
Preparation
If you have installed Windows XP or Vista then you will be on familiar ground with Windows 7. Microsoft haven’t fixed what wasn’t broken, merely refined it a little. All of the choices and dialog windows are much the same as previous editions, which will alleviate the learning curve for a lot of users.
To begin the process you will need to select your DVD drive as the first boot device on the PC. After a reboot, a black dialogue window will appear asking you to “Press any key to boot from CD or DVD.” After pressing a key you will be presented with another black screen as the setup program creates a RAM drive and loads the setup files into it.
Decisions, Decisions
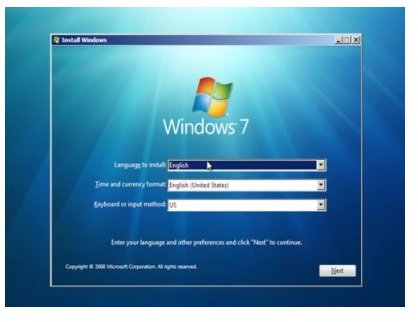
Once completed you will be presented with the first Windows blue screen where you choose your region and language settings.
Choose the relevant options and click Next.
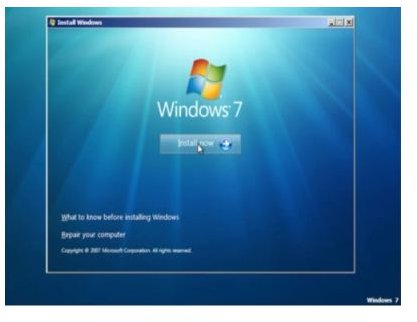
Here you have the option to check your system and perform other maintenance tasks that aren’t relevant to the install.Feel free to take a look around if you like, though.Click on “Install now” when you’re ready to begin the process proper.
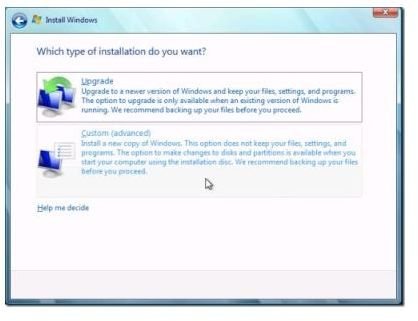
You will have to accept the inevitable license agreement to continue further, but once you have it’s time to choose the type of install you require.You have two choices here, Upgrade or Custom.Upgrade speaks for itself really, and if you are installing the release Candidate or live in Europe this option won’t be available either in the Release Candidate or the final release.
Choosing the ‘Custom (advanced)’ install leads to the “Where do you want to install Windows” dialog which allows you to specify which disk or partition to install the files.
Here you can create, format, or extend partitions dependent on your needs.Once you have specified where you want to install Windows, the program gets on with its job and begins the installation.
The “Installing Windows 7” screen will give you a running progress of the procedure.There will be reboots where you will be presented with various install and setup screens.Depending on your system this process can take between twenty minutes and one hour.

Most of the work will be done behind the scenes and won’t need any input from you until near the end.
Last Little Details
Once the bulk of the work is done, a final reboot takes place, and you see another black windows screen.
This time telling you “Setup is preparing your computer for first use.“It shouldn’t take long until you see the next screen where you are requested to input a username and computer name.Completing this and clicking “Next’ will forward you to the password screen.Enter a password and a hint if you want to.It isn’t compulsory, but is a good idea to have one for security.
The next screen requires you to enter the Window 7 product key.You can enter it here if you like, but you can also just click next to ignore it.I suggest ignoring it for now, and unchecking the “Automatically activate Windows when I’m online” box.We aren’t trying to fool the system here, just making sure the system works properly before going through the activation process.
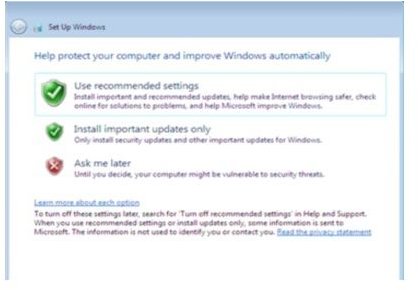
Next are the security settings.Users new to windows 7 should select the “Use recommended settings” option for now.You can always change it later.
After that you need to specify your time zone and set the clock. The following one sets up your network.For most home users, choosing “Home network” is the logical choice here.
That’s about it for the install.You should now see a plain blue screen with the words “Preparing your desktop” in the middle.This may remain for a few minutes while Windows completes the setup process, but as soon as it’s complete you will be greeted by your new Windows 7 desktop for the first time!
This was how to install Windows 7 on your computer. Now is the best time to install the device drivers for your hardware.Windows may detect and load many automatically, but it is wise for you to ensure all the newest drivers are installed and working properly to get the best out of your system.
References
-
Images taken by author
-
Personal experience with Windows 7