Restore System Restore Points on Old Windows Vista Config - Reclaim Disk Space from System Restore and Shadow Copies
Windows Vista’s System Restore feature is designed to give you the option of rolling back (restoring) your system to the exact, same state as it was at a particular point in time in the past. It regularly analyzes your system and sets up system snapshots or “restore points” that you can rollback your system back to.
You can reclaim precious disk space by deleting old system restore points and back up files, as well as shadow copies of program installation files. If you do not need this service, disabling it will free up system resources and speed up performance. Read on to learn how.
Tip #3 Remove Old System Restore Points
By default, Vista’s System Restore function automatically saves backup copies of your desktop at regular intervals, whenever you have an update or error to your system, or when you install a new application. This enables you to “restore” your system to a previous state should anything go wrong. However, many of these restore points are never used, but take up space, all the same. Free this disk space by getting rid of all but the most recently created restore points.
Tip #4: Clean Up Shadow Copies of Installed Programs
Shadow copies of your programs are created after installation and can remain on your system needlessly. Getting rid of these shadow copies will free up a lot of valuable disk space. Read on to learn how:
How to Remove Old System Restore Points and Shadow Copies
- Click on the Vista Orb to open the Start menu. Click on Computer
- Right click on “C.”
- Click on Disk CleanUp and let it conduct its calculation determining the amount of space it can free up.
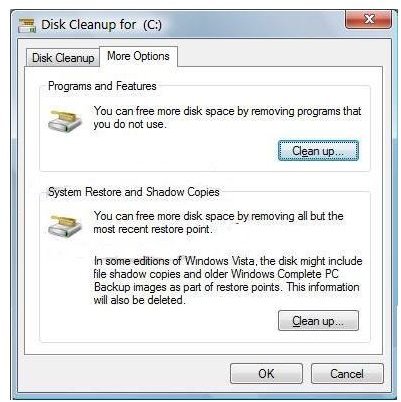
- Click on the More Options tab once it is done.
- Click on the Clean Up… button under the System Restore and Shadow Copies section.
- Click the Delete button if prompted, to confirm that you want to delete all except the most recent restore point.
This utility will erase all of the old restore points and files, reclaiming the disk space.
Tip #5 Disable System Restore
Windows Vista’s System Restore feature tends to take up a fair chunk of system resources and disk space to operate. By choosing to disable it, you will free up these resources, particularly those taken up creating restore points. Here’s how to disable it to free up system resources.
- Click on the Vista Orb to open the Start menu. Click on Control Panel and then select System and Maintenance
- Click on Backup and Restore Center**. In the left-hand pane,** select Create a restore point or change settings
- Click the Continue button and then click on the System Protection tab
- Uncheck your hard drive, which will be listed under “Automatic restore points”
- Click on the Turn System Restore Off button. Click the OK button to apply the settings
CAUTION:
- Do not disable this service unless you have an alternative back up for restoring your important files and settings such as an external drive, CD/DVD or online service. In the event of a crash, you lose the benefit of reverting to a previously-saved restore point - you will have to perform a clean install.
- Disabling System Restore will delete all previous restore points, so do not disable it if, for any reason, you want to keep them.
This post is part of the series: 21 More Super Ways to Speed Up Vista
Continuing in the series, Dianna Monda Dill shares 21 more of her favorite tips for improving the performance of Windows Vista. From the simplest to the most complex, here are 21 more power-user tips for Vista.
- 21 More Super Ways to Speed Up Vista - Part 1 - Setup Advanced Cleanup
- 21 More Super Ways to Speed Up Vista - Part 2 - Clean Up System Restore and Shadow Copies
- 21 More Super Ways to Speed Up Vista - Part 3 – Use ReadyBoost to Extend Memory
- 21 More Super Ways to Speed Up Vista - Part 4 - Optimize Your Paging File
- 21 More Super Ways to Speed Up Vista - Part 5 - Use Two Paging Files
- 21 More Super Ways to Speed Up Vista - Part 6 - Manage Your Virtual Memory Resources
- 21 More Super Ways to Speed Up Vista - Part 7 - Buy Vista Compatible Upgrade Components
- 21 More Super Ways to Speed Up Vista - Part 8 - Install Additional RAM
- 21 More Super Ways to Speed Up Vista - Part 9 - Upgrade Your Graphics Card
- 21 More Super Ways to Speed Up Vista - Part 10 - Upgrade Your Hard Disk Drive