An Easy Guide to Hughesnet E-mail Set-up for Outlook
Hughesnet E-mail Set-up for Outlook
Different ISPs (Internet service providers) have different requirements for accessing e-mail. Some restrict you to web based only, while others are more than happy for you to access e-mails via your favorite e-mail client.
HughesNet is one such provider, and with the correct settings entered into Outlook you will be able to send and receive e-mails from your desktop computer with ease.
In most cases, setting up an e-mail account in Outlook is simple, but in some cases the process can be difficult and require some advanced settings to be configured. We’re going to take a look now at the two ways in which you can configure Outlook to collect e-mails from your HughesNet account.
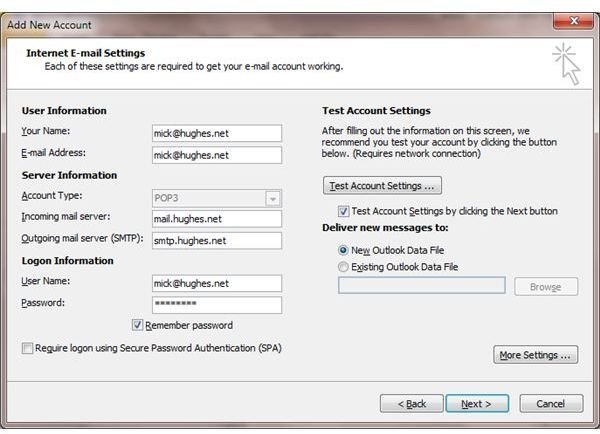
(Screenshot by author)
Automatic Configuration for Older Versions of Outlook
In some cases, setting up your HughesNet e-mail account in Outlook is just a case of visiting the HughesNet E-mail Set-up Tool webpage and following the instructions to download and run the configuration script on your PC. All you need to do here is select the E-mail Set-up Tool link, then click Run – the configuration script will then check your computer for Outlook and apply the correct email account settings.
This method is suitable for users of Outlook 2002 and 2003 and naturally requires you to have a valid HughesNet account, as well as having it as the opening web page in Internet Explorer 6.0 or later.
Meanwhile if you’re using Outlook 2010 or later, you can take advantage of automated set-up of your e-mail account by going to File > Add Account, where you need enter only your name, e-mail address and password (twice) for Outlook to then connect to your HughesNet domain and configure your e-mail account for you.
Manual HughesNet E-mail Set-up for Outlook
If neither of the above methods work, however, you will need to set up your e-mail details manually in Outlook. In Outlook 2010, go to File > Add Account and select Manually configure server settings or additional server types before clicking Next.
Here, select Internet E-mail and then in the Next screen enter your name and e-mail address in the appropriate fields. Decide on whether you wish to collect your e-mail via POP or IMAP (either is available) and then enter the server details:
Incoming mail server: mail.hughes.net
Outgoing mail server: smtp.hughes.net
For the Logon Information, your username (typically your e-mail address) and password should be entered.
Next, click on More Settings… and open the Outgoing Server tab. Here you should check the My outgoing server (SMTP) requires authentication option, along with the default option of Use same settings as my incoming mail server. Click OK, then Next and Finish to complete the set-up of your HughesNet account in Microsoft Outlook!
As you get used to manually setting up e-mail accounts in Outlook, the process becomes easier to remember - in the meantime, bookmark this page or print out the details for future reference.
References
HughesNet E-mail Set-up, https://hnetemailsetup.hughesnet.com/index_sun.html
HughesNet E-mail Set-up for Outlook, https://www.dbsinstall.com/Direcway/emailSetup/Outlook.asp