Quick Heal Total Security 2009 is a 10-in-1 security system, taking care of every imaginable kind of malware, right from viruses to worms.
Introduction
The latest antivirus from Quick Heal is Total Security 2009 . Quick Heal is not just an antivirus program, it also packs in a number of another modules, making it a complete security package for the average computer user.
Test Machine
• Compaq Presario CQ50 Notebook PC
• AMD Athlon Dual-Core QL 1.90 GHz
• 2.00 GB RAM
• 160 GB Hard Disk
• Microsoft Vista Home Basic
• Google Chrome/Mozilla Firefox Browsers
Installation (3 out of 5)
The installation process was easy, merely a matter of downloading the self-extracting installer file and running it. Before the installation starts, it is strongly recommended that all other Windows programs be shut down. This suggestion is a sensible one to follow, as if there are too many programs running, the installer will display the ‘Not Responding’ message.
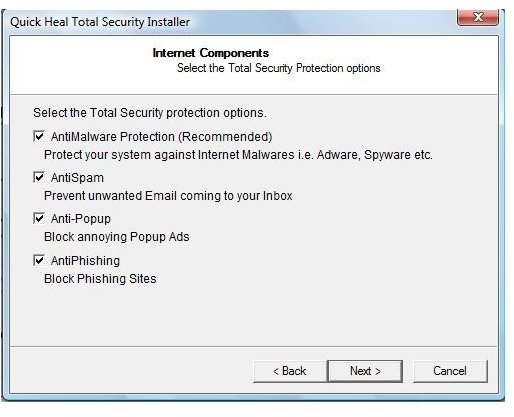
Quick Heal Total Security first scans the PC the second the installation completes. It then moves on to the other optional components, which the user has the option to select. These are Anti-Malware, Anti-Spam, Anti-Popup and Anti-Phishing.
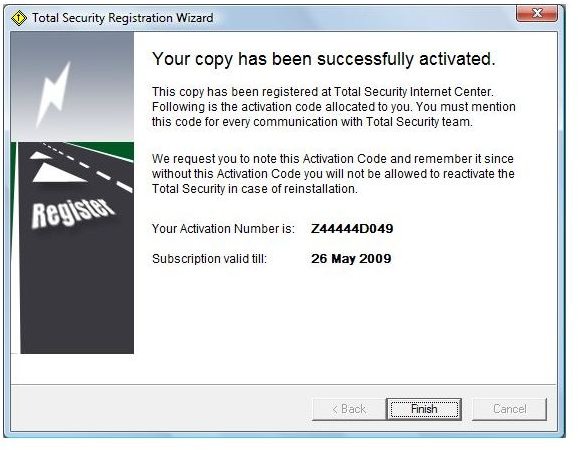
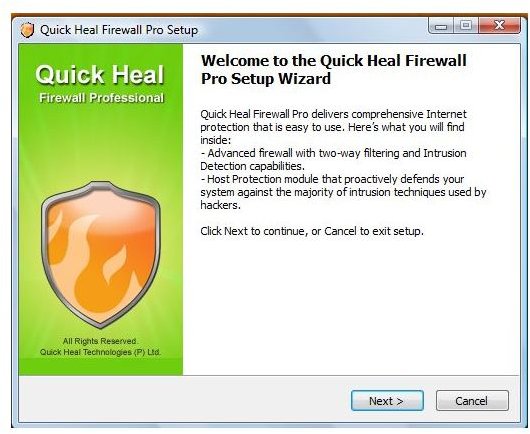
The next screen has three options – the first is to register the copy of the application online, the second is to check for updates, and the third is to install the Quick Heal Firewall Pro. All three are optional. If the registration is done at that time, a screen for all the user’s personal details comes up. The application displays a list of the information that will be sent for the registration, and then displays the activation number. The activation number is vital to the use of the application in the case of reinstallation.
The update then proceeds to start, and takes a while to finish; however this is entirely dependent on the Internet connection speed. The update didn’t complete on my machine; it stopped approximately halfway,
although the expected finish time kept on increasing.
The firewall installs last, and finishes quickly, prompting a computer restart. The Quick Heal Total Security menu detects the Quick Heal Firewall as ‘OFF’ till it is fully installed.
There was another version of one of Quick Heal’s products previously installed. As an aside, the new installation did not work till that version was uninstalled properly.
First Impressions (5 out of 5)
There are two new icons in the system tray – the silver gray shield is the icon for the firewall application, and the green symbol is the antivirus. Double clicking on the icon will start up the antivirus application. However, each subsequent time the icon is clicked upon, a new instance of the application starts up, a rather unusual occurrence.
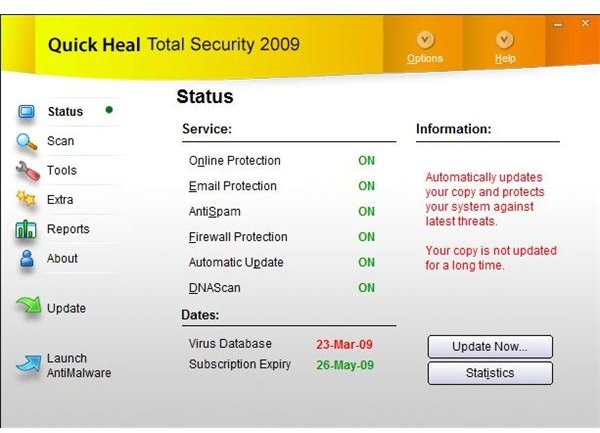
The menu screen is clearly set out, with the first screen displaying the status of all the protection modules. There is a list of menu options along the left side, with the Options menu on the top right next to Help.
The Tools menu has the Quarantine function, where a user can place selected suspect files to be checked out without exposing the entire system to threat. There is a Virus List, which lists out all known viruses for each major operating system platform. It also has a few more tools that are explained in greater detail in the Product Features section.
The Extra menu has more advanced features like the Track Cleaner, which clears electronic trails; Windows Spy, a tool that gives information about any window or dialog box by dragging and dropping a marker on it; and a Hijack Restore, which prevents unauthorised redirection of websites.
The Reports menu has detailed reports on the activities of each of the different modules.
Product Features (5 out of 5)
Quick Heal Total Security 2009 has been advertised as the 10-in-1 protection for the computer. There are exactly ten different kinds of protection applications that have been loaded into the software:
-
Antivirus – The main component is the antivirus, of course. The virus database definitions are pretty good, and on par with other antivirus programs.
-
Anti Spyware – Most antivirus programs do not catch spyware, so a large number of users install third party applications to remove threats of this type. It is a definite plus point to have this module bundled with the main antivirus program, precluding the need to install an entirely different program altogether.
Advertisement
-
Firewall – A firewall is the first line of defence. Quick Heal Firewall is extremely sophisticated, with a track log of all the incoming and outgoing transactions, allowing the user to have an instant view of all the network-related activity on the system. The firewall application also has an excellent process list, listing all the computer processes and the applications that started it. While Windows also has a task manager, it is more difficult to ascertain which applications started those processes.
-
Anti Spam – The anti spam filter is not too much of an issue for those that use web-based email accounts, but for the mail application users, spam mail can be problematic. Applications like Outlook still open emails in a pane below the inbox, leaving the computer vulnerable to attacks.
-
Anti Phishing – For those people who conduct their banking transactions online, phishing sites pose a very real threat. Phishing sites attempt to mimic an actual commercial website, and collect usernames and passwords of people that try and log in from there. This method of collecting personal data can seriously endanger a user, especially if the phishing site mimics a bank’s website. Phishing filters are usually installed as add-ons on web browsers, but it is unlikely that many users have them.
-
Data Theft Protection – This particular module prevents people from copying information onto removable media storage devices like pen drives.
-
Privacy Protection – Most computer activity is traceable at a later stage by following electronic trails through temporary folders and cookies. Privacy Protection empties all the folders that contain these sorts of trails; something an individual normally overlooks.
-
PC2Mobile Scan – A truly feature of Quick Heal Total Security is the ability to connect a number of mobile devices, one at a time, to the computer system and have the antivirus scan the mobile for unfriendly applications. As phones become smarter and contain more and more personal data, it is a vital and often overlooked area where security can be compromised.
-
Anti Rootkit - A rootkit is a malicious program designed to seize control of the operating system, and disguise the presence of other malicious software applications like viruses. A rootkit materially reduces the chances of catching and eliminating a virus, so it is important for an antivirus to be able to detect a rootkit first.
-
Anti Malware – Although all malicious applications come under the broad category of malware, it has been added as another module to emphasize the speed at which the module can scan various system files, folders and registries for any sort of unauthorised applications.
Price to Value (4 out of 5)
For $74 a year, the antivirus is on the higher side of the spectrum. But note that, if the application is purchased from their website, there is 30% discount available to customers.
That being said, the software is most definitely worth the extra amount, considering it packs in a number of modules that would individually cost much more than $74.
Additional features (4 out of 5)
Apart from the above features, Quick Heal Total Security 2009 has a few more, less targeted modules that are equally important:
• DNAScan Technology – This technology provides efficient protection against the various kinds of malware, like bots or worms that may not fit into one of the modules mentioned earlier.
• Emergency CD – Quick Heal Total Security will help the user to create a personal emergency CD that can clean the various drives and clean boot the system in the event that something goes awry.
• Native Boot Scan – A great tool to remove the most cleverly hidden malware, by scanning the computer during the system boot, before the operating system loads fully.
• Efficient Remote Support – The support services are excellent, with prompt responses to any query or difficulty arising from the operation of the antivirus.
Conclusion
Quick Heal Total Security 2009 is an excellent product, containing all the possible safeguards to the threats that are present in the virtual world at present. Without a doubt, this package is worth the price. The only glitch that I encountered was with the update module, which got stuck halfway and failed to update at that time. Note too that Quick Heal will slow a low-RAM system considerably, and so is only a viable solution for people with a high-end systems. The best feature of Total Security is that it takes over every aspect of security without the user needing to do anything at all, thereby giving a great sense of security.
More Reviews!
Would you like to read more reviews? Look around Bright Hub and you’ll find reviews of numerous other top antivirus and security solutions including Norton Internet Security , Kaspersky Internet Security , McAfee Total Protection , Blink Professional and ZoneAlarm Internet Security Suite .


