How to Connect a PC to a Mac Over a Local Network
Connecting a PC to a Mac
Macintosh users often want to share their files with Windows computers, both at home and work. You may have files on PC that you want to copy or move to your Mac. You may want to move your Photoshop, Adobe, Quicken, and other application files. If you’ve a collection of image files (GIF, BMP, JPEG, TIFF and so on), audio files (MP3, AIFF, WAV and more) or video files (AVI, MPEG, QuickTime, Flash, etc.), you can move almost all of them to your Mac.
Using portable storage devices like Flash drives or ZIP disks does the job decently, but for frequent use, a fixed connection is more robust. Mac OS X comes with technologies that allow quick and easy file sharing between different platforms.
Create a Connection
There are different ways to connect a Mac to a PC. You may connect both computers to a local network. I created a direct connection between my Mac and PC with an Ethernet cable. This is a straight forward method and the good thing about this is that you only need a cross-over cable to create a connection. When you connect the both computers with the cable, your Mac will automatically detect that it’s connecting to a Windows PC.
Buy an Ethernet cable from a local computer shop or buy it online from websites like eBay.com, etc. A 5 feet cross-over Ethernet cable with two RJ45 connectors will cost you around US $2. Once you’ve the cable, connect one end of the cable to your Mac and the other to the PC.
After plugging the cable to the computers, go to the PC and open System Properties from Control Panel. Click on the Computer Name tab and check the workgroup name. The default workgroup name set on Windows XP is MSHOME and WORKGROUP on Windows Vista.
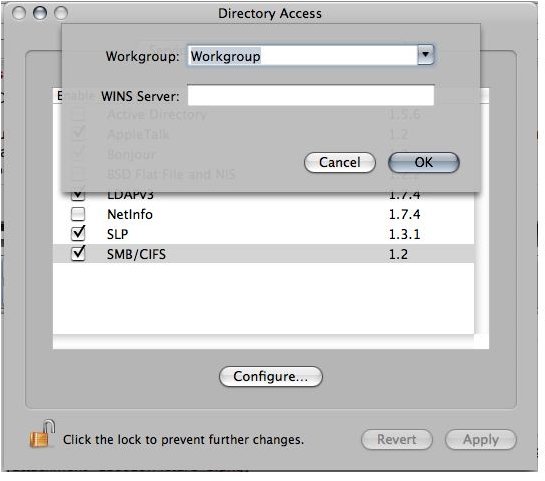
Now go to your Mac and open up Directory Access from the Utilities folder. Next, double-click on SMB/CIFS and type in the same workgroup name you’ve on the Windows computer.
Note: If you can’t make changes, click on the lock at bottom-left side of the screen and then try again.
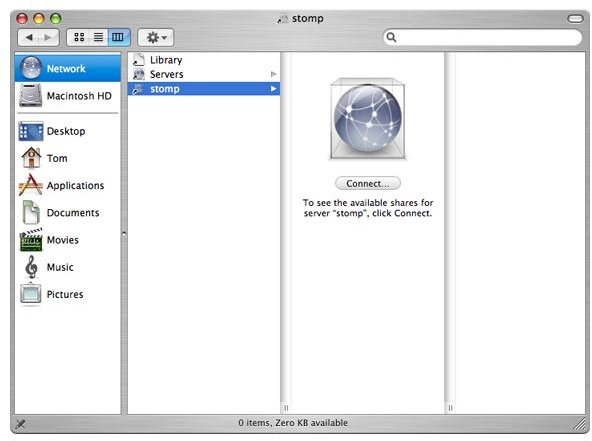
Open up the Finder window (click on the Finder icon in the Dock) and click Go →Network. Next, locate the name of your PC and login with your Windows user credentials.
Viewing Mac Files from a PC
Mac OS’s SMB/CIFS Server makes it very easy for you to view Mac files on the PC. You can go to the Windows Network Neighborhood to view your shared folders on Mac. To do that, you need to turn on the Windows File Sharing option on your Mac and check off the “Allow users to login from Windows” checkbox.
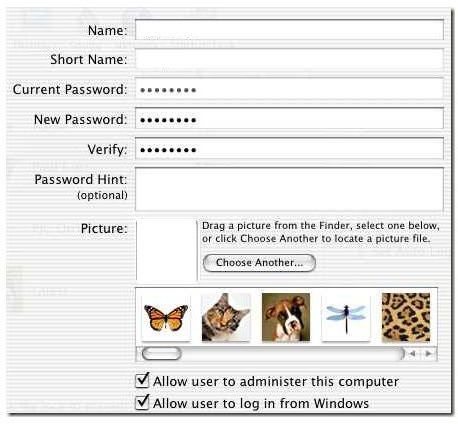
Note: If it is your account you are setting, you will need to enter your password in the Current Password textbox before you check the checkbox.
Viewing PC Files from a Mac
You may have folders on your PC that you want to open from Mac. On your PC, share the folders you want to access from your Mac. To connect to them from Mac, open up the Finder window, select Go and click on the Connect to Server dialog. You will see the PC name shown there. Click on the PC name and click Connect. If the connection to the folder is successful, you will be able to browse your files as though they are on your Mac.