Upgrading my MacBook Hard Drive & Adding Ram to Macbook - How to Buy & Install Your Own HardDrive & RAM to Save Money
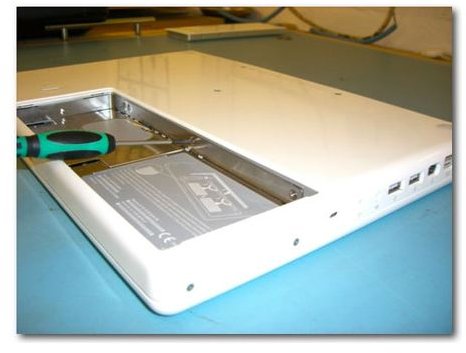
L-Bracket
Before I had done research on how to upgrade the MacBook Hard Drive, I called a local Mac retailer and asked them what the charge was for a hard drive upgrade. They told me $275. This seemed ridiculous to me. It is easier than you would think to swap your Mac hard drive and add RAM.
There is no way that I could afford this. Plus I knew for fact that there was a heavy installation charge looped onto that $275 this guy wanted. So the first thing I did was go out and price new hard drives. The first thing I noticed is that all hard drives I looked at were much cheaper than what the Apple store offered. Also, they were far cheaper than what apple charges for a hard drive upgrade. So going out and purchasing a hard drive from a local electronics retailer is definitely the way to go.
I found one that was around $70 for 320gb. It was good brand too, Western Digital. Note: MacBooks require a standard laptop 2.5" SATA drive. Also, if you are looking to upgrade your RAM… do not buy from Apple or have it installed as it is very simple to do yourself. It is a good idea to install new RAM when you are installing a new hard drive as they are located in the same area.
-
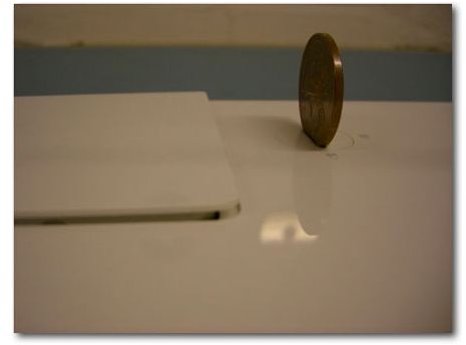
The first step to installing a new hard drive is to remove the MacBook battery. You will also want to make sure that the power cord is not connected, and make sure the unit is off. All you have to do to remove the battery is put a quarter and the slot and turn. This should automatically release the battery. Next, simply remove the battery and set it aside.
-
For the next steps, you are going to want to wear a anti-static wristband to ground out the electricity in your body. These are readily available at your local Best Buy or Radio Shack for a couple bucks.
-
Unscrew the L-shaped bracket which is held in place by 3 screws. Note: these screws cannot be removed from the bracket, they just allow you to release the bracket from the base.
-
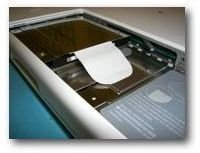
After you have the L-shaped bracket removed, you will see a white paper tab located along the same side as the short end of the bracket was. This is your hard drive. All you have to do is gently pull out on the tab to free your hard drive and keep pulling until the hard drive is sitting in the battery bay. Remove the hard drive and set it to the side.
-
Now you will want to install a RAM upgrade if you so choose. When you removed the L-bracket you will have noticed that two levers popped up along the longer side. If you toggle these two levers, it will pop out the RAM. Now all you will have to do is simply push your existing RAM in the same way your old RAM came out, until the levers click back.
-
Now, grab the hard drive that you set aside and remove the shield over it. The shield is held to the hard drive by 4 small screws. Be sure that you place the shield on your new hard drive the same way it came off of your old hard drive; and replace screws. Now just slide your new hard drive in the same way you took it out.
-
Finally, screw the L-bracket in. Last step, replace the battery and boot up your computer. The MacBook should instantly recognize your new hard drive and RAM.
Using this method of upgrading yourself, you could easily be looking at a savings of $200 for what some people will charge.
Battery Removal