Getting Rid of Duplicate Audio Files: iTunes - Mac Guides
Duplicate Files in iTunes? Why?
As with any new piece of software or hardware that releases, iTunes has its share of bugs. Notwithstanding the multiple updates that Apple has put out for the service, the “bug” of duplicate files is one that seems to plague quite a few music lovers out there, yet it’s not really a bug at all. Technically speaking, you can file this one under “user error”, and thankfully Apple has taken note of it and provided a built in solution to get rid of these duplicate files in iTunes.
Step 1: Display Your Duplicate Files
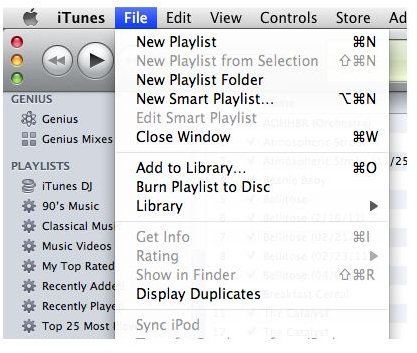
In order to make iTunes display only your duplicate music files, you need to look under the “File” directory and select “Display Duplicates”.
What this does is change your default iTunes browser into something a little different, with all the duplicate files shown on the right-hand side. Your first instinct here will be to simply highlight and delete all of these files, but don’t do that. Doing so will only erase many files that you still need.
The next step, despite how impractical it may sound, is actually slightly more complicated than this one, but it’s really the last step to getting rid of duplicate audio files for Mac.
Step 2: Sorting by date and deleting

As a forewarning to this step, know that if you aren’t entirely sure in what you’re doing, it’s probably best to let someone who does know what they’re doing handle this step. It’s not ridiculously complex, but if you’re aren’t sure about one or two factors, you should consider backing down for now.
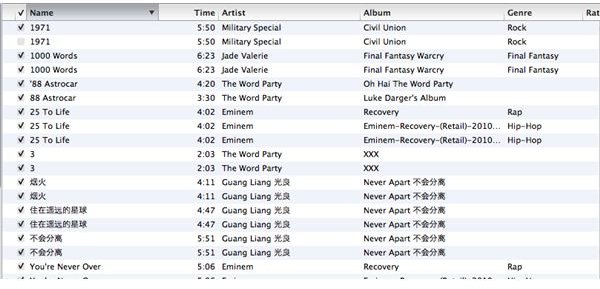
After you display all your iTunes duplicate audio files, you’re going to want to sort them by “Date Added”. To do this, right click on the empty white box (shown in the upper left corner of the image to the side) and click on “Date Added”. Make sure that older dates are at the bottom, and then scroll down. In the position you’re currently viewing, all of your duplicate files should be at the bottom, and all the “real” (in this case it just means “newer”) duplicates are at the top. If you scroll halfway up, highlight everything from there down (alternately, scroll to the song right before the duplicate of the file you selected), and delete them, you should take care of all the duplicate audio files in iTunes.
Warnings and Precautions when Getting Rid of Duplicate Audio Files
While this is a relatively simple process, there are a few things I’ve learned you’ll want to watch out for:
- If you’re a musician (that is, you compose your own music) and you import files into iTunes a lot, often times those files will have the same name. This method would delete all but the newest of those files. If you want to protect your files, rename them to add dates or other watermarks that differentiate them from the group.
- Remixes of the same song by different artists are often deleted unintentionally. If you want to avoid doing this as well, rename remixes to have some sort of watermark of the artist who remixed it.
Other than that, things should go pretty smoothly for you. Happy deleting!
References:
1. Information Reference: https://support.apple.com/kb/ht2905
2. Image Reference: All images are screenshots taken by the author.
