How To Set Up A USB Jump Drive
Introduction
In this article I am going to show you how to set up a USB jump drive from both Linux and Windows. These are especially useful if you do not have any CDs lying around or just do not have a working CD drive to begin with. The first method I am going to show involves a program called unetbootin which can be used under both Windows and Linux, and the second one is using the USB startup creator in Ubuntu.
Most Linux distributions require a memory stick of at least 1GB. However, if you are using something small such as DSL or Puppy Linux you can get away with using a far smaller memory stick.
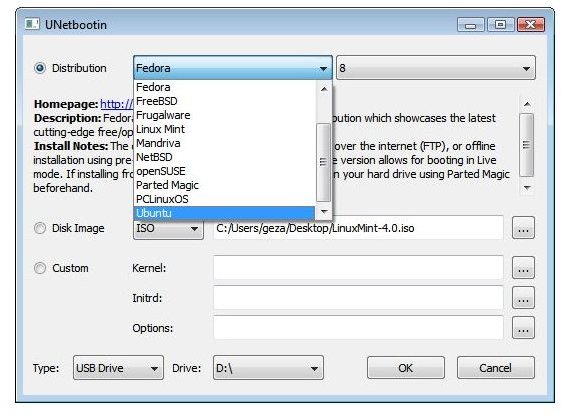
Unetbootin
Unetbootin is a very useful application made for both Windows and Linux because it allows you to create a bootable USB stick of your choice within minutes. If you already have the iso file already all you need to do is select “Diskimage” from the left hand side and click the botton saying “…” to open up file explorer. Once you have found the iso file choose your drive and click ok then allow the program to do the rest.
If you do not have the iso file already, you can easily download the correct file from within unetbootin. If you choose distribution then you get a whole list of distributions ideal for booting from a USB jump drive. You can then also choose your version and have unetbootin download the distribution you like and install it to a USB jump drive automatically.
Ubuntu Startup Disk Creator
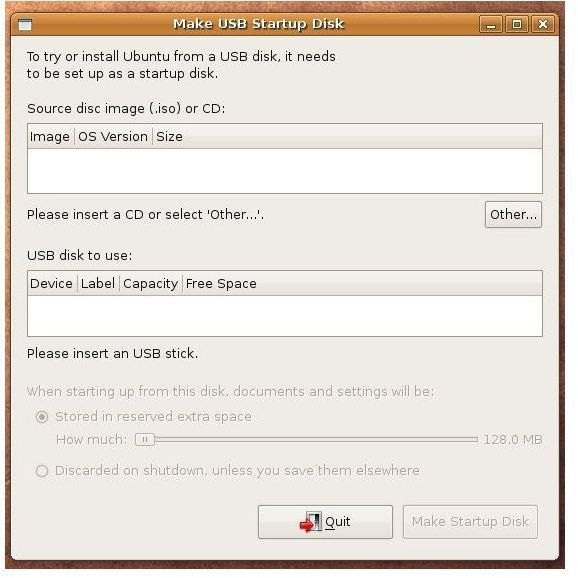
Ubuntu comes with a startup disk creator ideal for creating live USB jump drives to boot from. The Ubuntu team designed it so that it can make USB startup disks for almost every distribution, so even if you are not wanting to boot Ubuntu you can still use this program.
In order to run the disk creator, just type “sudo usb-creator” into your terminal or navigate to “System -> Administration -> USB Startup Disk Creator”. Once you have opened the disk creator you can select the disk image to use by clicking “Other” and then select your USB drive. Finally you will want to decide whether to make it a persistent or live installation, a persistent installation is one where things such as your documents and settings are saved. You will want to use persistent if you are planning to boot from USB for a long time. If you are just planning an installation then live should be fine.
Conclusion
Within this article I have shown you two ways in which you can create a USB Linux jump drive. The method using unetbootin is my preferred method due to the fact that it can automatically download and install the distributions for you, and usually does not go wrong no matter what installation you give it. It also supports a custom minimal distribution for advance users where you can select your own modified kernal.
The second method is for ease-of-use if you are already using Ubuntu and can have problems with some distributions however they have improved since Ubuntu 10.04. If you have any questions or comments please leave them below and I will get back to you as soon as I can.