Puppy Linux: Initial Setup of the Distro Following Installation
Puppy Setup
Performing configuration changes to Puppy Linux is easily achieved through its intuitive Puppy Setup options, accessible by simply clicking on the Setup icon located on the desktop. From here, users are able to make any necessary changes, or initiate features not setup by the default installation. Among the configurable features are the ability to modify country settings, the way in which Puppy starts up, changes to mouse and keyboard, settings for sound, video, modem connectivity, Internet, printing, optical drives and even setup of a firewall for added protection.
While the list is comprehensive, most users will only need to configure a handful of these services on their Puppy Linux installation.
Setup Essential Components
From the 10 available setup options in Puppy Linux, only a handful are considered essential, with the network interface leading the way. By default, Puppy Linux may not configure your network connectivity. Additionally, if the PC is connected to a different network after its initial setup, it may no longer connect to the new network, or even the Internet. But resolving this issue is extremely easy.
Internet Setup
After accessing the Puppy Setup:
Click on **Connect to Internet by network interface**.
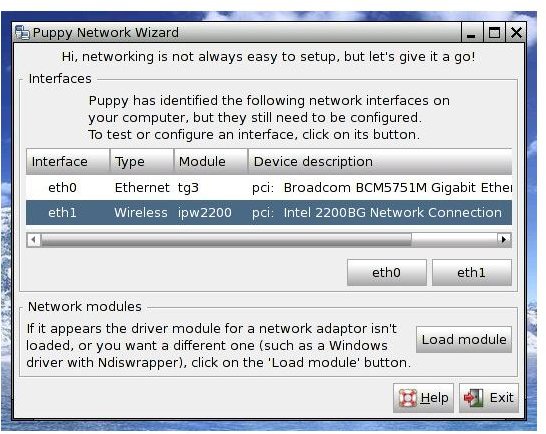
- On the Puppy Network wizard window, your network interface will be listed.
- Test the network interface by clicking on the button corresponding to the interface listed. Typically, eth0 will be assigned to the Ethernet connection.
- A new window will open with a series of available testing and configuration options. Click on the Test eth0 button to test your port. You should see a successful result as indicated by the phrase “Puppy was able to find a live network” across the top of the window.
- Now that the port was found and testing passed, it is time to acquire an IP address and connect to the Internet. Click on the Auto DHCP button to complete this.
- You will be prompted to save the configuration. Click on Yes.
- Finalize the setup by clicking on Done.
You are now properly configured for Internet connectivity. Make sure to perform this procedure anytime changes are made to the network or if the PC is moved to another network.
Printer Setup
Another commonly used setup process is printer setup, which allows you to add a new printer.
- In the Puppy Setup window, click on Setup CUPS Printing.
- When asked if you wish to add a printer, select Yes.
- A window labeled CUPS Web Interface Help opens with detailed instructions on adding a printer. Within a few seconds, the Common UNIX Printing System window will open. This is where the printer configuration will take place.
- Click on Administration.
- Click on Add Printers on the bottom section of the window under “Printers”.
- Enter a name for your printer. For this example I am entering the brand and model of my printer, “CanonIP5200R”, leave all other fields blank, and click on Continue.
- On the Security Warning window, click on Continue.
- In the Device list, locate the port you are using. In my example, the system assigned the printer to the USB Printer #1 port, so I select this port for my printer setup and click on Continue.
- Again, on the Security Warning window, click on Continue.
- In the Make list, locate the manufacturer of the printer. In my example, I select Canon and click on Continue to proceed.
- Again, on the Security Warning window, click on Continue.
- In the Model list, locate the model or compatible model of your printer. In my example, I select the Canon PIXMA iP5200… and click on Continue.
- Again, on the Security Warning window, click on Continue to complete the printer installation.
This should complete the printer installation. You can go to Printers and print a test page for the newly added printer in Puppy Linux.
This post is part of the series: Puppy Linux - Comprehensive User Guide
What do you get when a Linux-based operating system distribution is designed for all user levels, from beginner to pros; is feature-packed with every essential application you need; runs on just about any PC; takes less than 100 megs of space; and is absolutely free? A Puppy: Puppy Linux, that is.