How to Install Linux? Installing Linux from ISO or CD?
Introduction
Have you seen our previous article about making the switch from Windows to Linux? If not, and that’s your plan, we recommend that you take a look at first since it has valuable information such as how to take a Linux test drive with “WUBI” and a Linux pre-installation checklist.
When everything mentioned in that article is complete, you can go to the home page of the distribution of your choice and download the ISO file that is for your architecture. For the time being, I suggest you to download the x86 version, which is 32 bit, supported by almost all the hardware in the market. Intel’s Core 2 Duo and AMD processors with 64 suffix support 64 bit command sets, but the available 64-bit programs and/or drivers may be limited compared to 32 bit ones.
You can install your Linux distribution from CD/DVD or if your computer supports, from USB drive. You can check this by rebooting your computer and checking the BIOS for boot device priority. If you can set the first boot device to USB then you can go for this. Installing from USB devices, such as thumb drives, will be faster compared to CD/DVD installs but require a small amount of additional work at the beginning, the rest is the same.
From now on I assume that you already have an ISO file saved on your computer. I will first start with the USB thumb drive option.
UNetBootin
**
Make sure that you back up all your data in the USB drive because at the end of this operation everything will be permanently deleted!
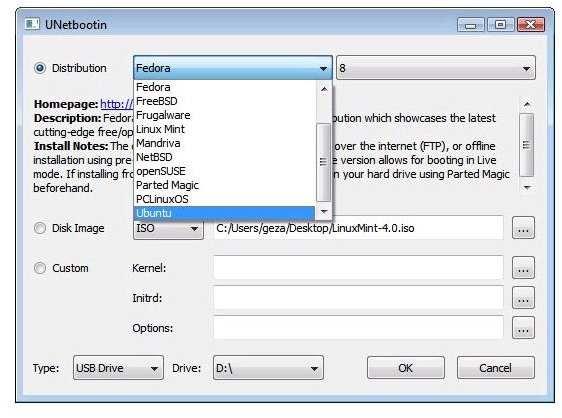
UNetBootin is a small program that prepares your USB thumb drive as a bootable disk. After downloading and installing it, select your distribution from the drop-down list from the top. From the “Disk image” make sure ISO is selected and then select the ISO file you have downloaded. Do not change anything under the “Custom” section. Finally, at the bottom, select “USB Drive” under “Type”, the drive letter that Windows assigned under “Drive” heading. When you hit “OK” your USB drive will be formatted first and then the files will be copied.
Burn CD/DVD
You should not burn your CD/DVD as you do everyday to backup your files. Instead, you have to select the option to write a bootable image/ISO file or bootable medium. Some CD/DVD burning programs are capable of handling ISO files directly on double click. If you do not make the selection to burn a bootable image, you will not be able to access the installation features on the CD/DVD because it simply it not bootable.
Partitioning
Here is where many users become nervous. In fact, partitioning is making available space for installing an operating system. If you want to allocate all of your hard disk, then you can skip this section because the Linux installer will ask you later if you want to use your entire hard disk for installation and will do the rest. If you will not do that, then you have to allocate some space for your Linux installation. A 10 Gigabyte partition will do fine for the beginning, if you run out of space, you can use the empty space in your Windows partition.
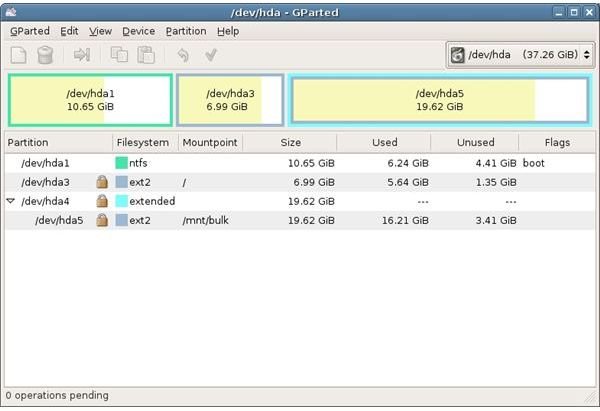
The easiest tool for partitioning is GParted, a Live CD which you will boot and be able to resize the partitions with a graphical tool. When you make some space of your choice, tell GParted to a primary partition in ext3 format. As this process may take a while, this would be a good time to get a cup of coffee.
If you are using Windows Vista, right click on “My Computer,” select “Manage,” and then “Disk Management.” Right click on the Vista partition at the bottom pane and select “Shrink partition.” The tool will do its job and free up some space in your hard disk, available for partitioning.
[Ed. If the Vista Disk Management tool fails to provide adequate shrink space to install a new OS you can refer to this article. It was written for Windows 7, but the same steps apply for installing Linux on a new partition on an existing hard drive.]
If you want to have Linux together with Windows:
- Make sure that you have backed up all your important files,
- Make sure that Windows is installed first,
- Before partitioning Windows, make sure to defragment your hard disk.
Installation
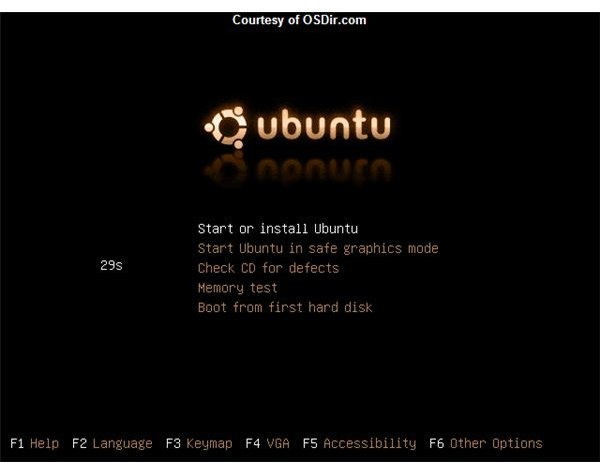
When you are done, either place your CD/DVD to your drive or plug in your USB stick and reboot. When the bootable medium is detected, you will be presented with boot options. Although the image above is from an Ubuntu install, the options are more or less the same for other distributions.
- Start or install Ubuntu: Ubuntu is a “Live CD” that can be run from the CD drive without making any changes to your computer. We will use this option to boot into Ubuntu Desktop.
- Start Ubuntu in safe graphics mode: If you cannot reach Ubuntu desktop or you are having problems with your graphics card, select this option.
- Check CD for defects: I strongly recommend you to go for this option before installation. It is better to safe than sorry, therefore check that your CD if it is properly written and the files are not damaged.
- Memory test: Self-explanatory I believe.
- Boot from first hard disk: Does not do anything to your computer nor start installation. This option just boots the computer with whatever is installed.
After we check our CD for defects, we select the “Start or install Ubuntu” option. We will wait a little bit for Ubuntu to load and then double click on the installer icon on the desktop to start the installer. The installer takes seven steps to gather all the information it needs:
- Select your language
- Select your location and set your time zone
- Choose your keyboard layout
- Prepare disk space: Can be guided, use entire disk, use the largest continuous free space, or can be manual
- Migrate Documents and Settings (if you have Windows installed)
- Choose your user name, password, and your computer name
- Review your choices and install
In this setup scenario, pay particular attention to the step number 6. You will use your user name and password to log on to the system and for system administration. Do not underestimate the password and choose a strong one.
When everything is done, you will be asked to reboot your computer. Do not forget to remove the CD when the computer shuts down. Your computer will boot to your graphical desktop.
Congratulations! Now you have taken the first step in getting started with Linux.
This post is part of the series: Getting Started with Linux
We have created a “Getting Started with Linux” series to assist all the new users in their quest to start working with the most enjoyable operating system. We have some tips and tricks along the way so make sure you read everything carefully.