Linux Video Editing: KDENLIVE – Page 1
Introduction
In this article, we will look more closely at KDENLIVE – a simple and easy to use applications that allows you to work very easily with video files, without audio/video syncing problems or having to go into detailed menus.
KDENLIVE stands for “K Desktop Environment Non Linear Video Editor.” It is a very simple and stable Linux video editor. Of course, there are other Linux video editing tools as well from basic to advanced, from free to commercial, which Jesma covered in her article “Video Editing Software for Linux.”
Working with KDENLIVE
I have to say upfront that KDENLIVE shares the interface and usage model that many of the video editing programs have. In other words, the basic structure of video editing programs is present in KDENLIVE.
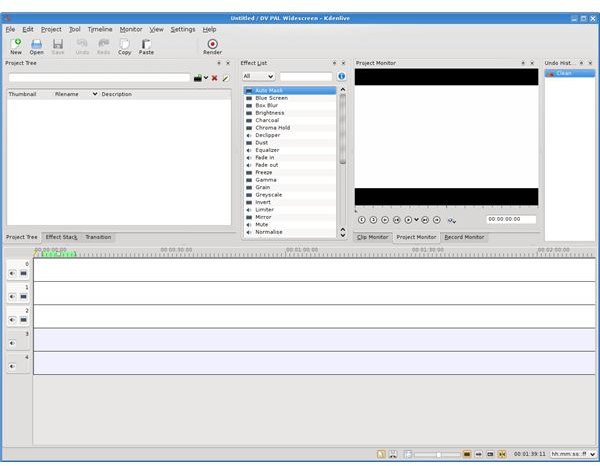
When you open KDENLIVE, you see the window split into four parts. The top part is the menu and icon bar as is almost always the case. The middle part is split into two, the left part is the project tree, the right side is previewer/timeline editor, and the bottom part is the timeline and keyframes.
I would like to make a note about importing movie clips before we get going. You can download the files to your computer by using a file manager (putting your camera in USB Mass Storage Mode), by using specialized software if your camera has one for Linux, or by importing directly from KDENLIVE’s interface. In the right pane, clicking on the “Capture Monitor” you can access the features for importing clips directly to your computer. I suggest you to check the compatible cameras before you go with this option. Personally I would go with the USB Mass Storage Mode, where, after plugging your camera into a USB port, your computer will recognize the camera as an external disk and you will be able to cut/copy the contents to your hard disk. This mode will be easier and will use up fewer resources of your computer (sometimes the programs crash when importing from cameras). If USB mode is not available, then your only option will be to use the other connection methods.
Let’s get started. You have to import all of your movie clips that you will use in the project to KDENLIVE. You can go through this importing process from the menus. When all your clips are imported, let your imagination and creativity go wild. Drop your clips to the timeline at the below pane, where KDENLIVE will automatically arrange the timings depending on the clip length. No need to say, you can cut/copy/paste in your clips. If the part between 05:13 and 08:42 is important to you, go ahead and cut it, paste it, and discard the changes. KDENLIVE lets you use your clips like a word processor.
Working with KDENLIVE
Did I mention that you can embed sounds to your movies? The sounds can be background music or your narration on the movie. As I have just said, your imagination, creativity and experience will be the main tools in making a perfect movie; KDENLIVE only gives you the tools to go down the road.
When our movie clips and sounds are in place, we can go on to add a little spice with the transitions. You can select transitions between the clips by selecting which transition you want from the “Transition” tab in the middle left pane. What’s more, you can even insert effects from the “Effect List” and arrange them from the “Effect Stack” tab. I recommend that you go easy on the effects and transitions, as many amateur users fail to do, because they reduce the “watchability” of the movie. When you select either a transition or an effect, you simply drop it to the timeline between the clips and KDENLIVE takes care of the rest.
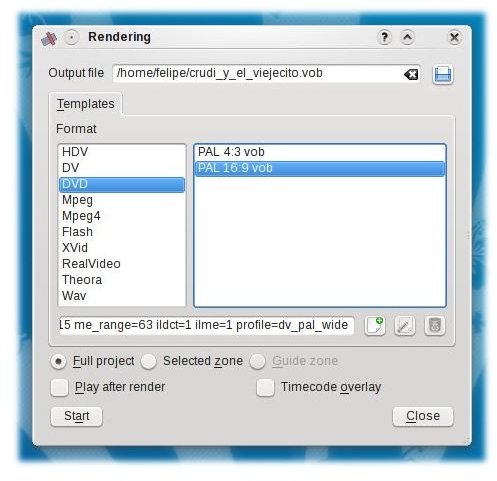
Now that we are set with our movie by putting everything in our pot, the clips and our creativity, we finally start cooking, which is rendering. Rendering will deliver our delicious meal, our final movie. There are a lot of options readily available for you; have a High Definition TV? Go for 1080i or 720p resolution. Want a DVD? The options are there. Saving space? What about XVid?
Bright Hub tip: You can use KDENLIVE to take sounds from movies. Open a VOB file that has the sound you are interested in. Drop the file to the timeline and you will see that the movie and the sound are on separate lines. Delete the movie and you will have the sound. Unleash your cut/copy/paste passion to do the remaining job.
Final Words
I believe KDENLIVE is sufficient for almost all needs of an amateur videographer. The tools are there, made simple, and the software does not have a steep learning curve. There is a very active community in the forum, which is hosted on the project’s website. With this video editing software, you can turn all your video and DVD projects into reality in a very short time. Do not listen to the gurus who say Linux is limited; it is far more unlimited than their imagination.
KDENLIVE Main Window screenshot courtesy of KDENLIVE.
KDENLIVE Rendering Options screenshot courtesy of Pollycoke.