Setting Up a Wireless Network in Linux - The Basics of Networking With Linux
Introduction
Building a wireless network, whether a home network or a business network, is basically the same as a wired, considering the principles. We have some basic building blocks and we use them at the right place and wherever necessary.
Before rolling up your sleeves and rushing to the nearest techno-market to buy stuff, first define your wireless network. What components will you have? What do you want to do except connecting to the Internet everywhere in your home? These are covered in detail at Bright Hub. Make sure that you read the article in advance, because from now on I am assuming that you already know about setting up a wireless network. We will proceed with the Linux side.
Setting up a Linux wireless network is no different from Windows, given that you followed my advice and got one wireless router with an Ethernet connection. If you did, the rest is easy.
The most important thing in your wireless network is the security. I suggest you read Lamar Stonecypher’s article on wireless security. Nowhere on the Internet I could find an article easier than his. When you go through the wireless security, you need to make the right configuration in your wireless router. On your Linux box, be sure to have wpa_supplicant package installed. Otherwise you will not be able to use WPA (Wi-fi Protected Access) security in your network. You do not need the wpa_supplicant package for WEP (Wired Equivalent Protection), but you will need it if you want to connect to a WPA-protected access point later.
To set up a wireless network in Linux, you have two options: the command line interface and network managers.
Command Line Interface
Although you may not like the command line interface (cli for short), it pays to know how things are going. If your network manager closes for some reason, you can get up and running with your cli knowledge.
In Linux, the command ifconfig (interface config) configures your network interfaces. Issuing the command with no option/parameter lists your network interfaces. A sample ifconfig output looks as follows:
eth0 Link encap: Ethernet HWaddr 00:0F:20:CF:8B:42
inet address: 217.149.127.10 Bcast:217.149.127.63 Mask:255.255.255.192
UP BROADCAST RUNNING MULTICAST MTU:1500 Metric:1
RX packets:2472694671 errors:1 dropped:0 overruns:0 frame:0
TX packets:44641779 errors:0 dropped:0 overruns:0 carrier:0 collisions:0 txqueuelen:1000
RX bytes:1761467179 (1679.8 Mb) TX bytes:2870928587 (2737.9 Mb) Interrupt:28
Command Line Interface - continued
In the output, if your wireless card is running, in addition to the above, you will see eth1, wifi0 or something similar, such as:
eth1 IEEE 802.11g ESSID:“Starbucks”
Mode:Managed Frequency:2.427 GHz Access Point: 00:DD:8F:A2:13:B8
Bit Rate=48 Mb/s Tx-Power=20 dBm Sensitivity=8/0Retry limit:7 RTS thr:off Fragment thr:off Power Management:off
Link Quality=61/100 Signal level=-38 dBm Noise level=-81 dBm
Rx invalid nwid:0 Rx invalid crypt:860 Rx invalid frag:0
To configure our Linux wireless network interface, we use iwconfig (interface wireless config), which is coded for the wireless interfaces in mind (you can install iwconfig and the other wireless tools from your distribution’s package manager.) The output of iwconfig will be the same as ifconfig. The important information to note is the interface name, which is eth1 above. Depending on your wireless card, this could be wifi0, ath0, etc..
Second, we have to know which wireless router to connect. We determine this by the SSID (Service Set Identifier.) If we know the SSID of the router to connect -say brighthub-, we issue the iwconfig command as follows:
iwconfig eth1 essid brighthub
However, if your interface is not already in use, you have to get it up to work by issuing ifconfig eth1 up first. Please note this is “ifconfig” not “iwconfig”.
When you install iwconfig, your distribution will possibly install all wireless commands; the wireless utilities. In these utilities, there is the iwlist which lists all the access points that your computer can see. To list them, you issue iwlist as follows:
iwlist eth1 scanning
If you read the main pages for iwconfig and iwlist, you will see that there are more options available. For example,
iwconfig eth1 essid brighthub restricted passwd
will associate your linux computer to a wireless network named brighthub through your wireless adapter named eth1 and will send the passwd as the WEP password. To get connected, the final step is the following command:
dhcpcd eth1
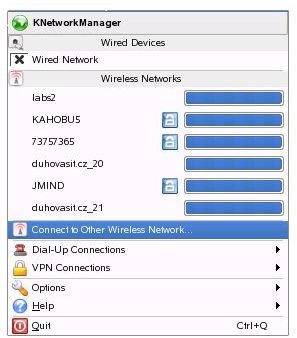
Network Managers

These are the easiest programs to get connected to wireless networks. They do a scan for you and connect to a network (public network if open or your preconfigured wireless network) automatically. Making the configuration through the network manager’s interface is easy and there is no pain associated (as in the command line).
In the two screenshots, you see the Gnome Network Manager and KNetworkManager. In Gnome, you have to make some basic configurations, such as which wireless protection to use, wireless key type, etc.. In the KDE counterpart, the available networks are listed and you switch them with one click. However, if you want to connect to a network that is not configured in your Linux computer and require authentication, clicking on the network name will take you to the configuration window, where you have to enter wireless protection settings manually. In either case, what you enter in the network manager or type in the command line must be same as the information entered in your wireless router. Otherwise you will not be able to connect.
Conclusion
What I have explained in this article is the most basic of the basics to take your first steps in Linux wireless networking. You can start moving with what you have read in the article but in order to go further, you need to do a little bit of research on the Internet.
References
Author’s own experience