Motherboard screws are an important part of your PC hardware, and there is a right and wrong way to go about installing them.
PC Hardware
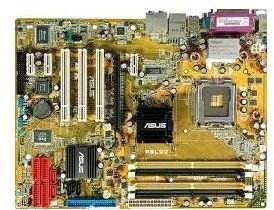
When you mount a motherboard inside of a computer case, it must be held firmly in place. While things like the hard drive and DVD-RW drives often mount in the case using rails that slide in and out, the motherboard must still be attached using screws and standoffs. In this article, we’ll discuss why they are important and how to properly install motherboard screws.
Motherboard Installation
The motherboard inside your computer is made of a flexible epoxy resin that contains circuitry that allows all the components of your computer to talk with one another. Because everything is crammed into such a small space, the motherboard is especially sensitive to electrical interference as well as heat.
If you’ve ever mounted a motherboard inside a PC case, you will see that it uses a half dozen or more screws. That may seem like overkill, but it’s necessary. The reason why so many motherboard screws hold it in place is to guarantee not only that the board will not slide around inside the case, but also to keep it flat and firm. All that electricity plus heat generated inside the case could potentially warp the motherboard if it were just propped up inside there and not properly mounted.
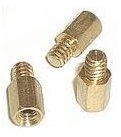
Motherboard Standoffs
Before you tighten down the motherboard, you need to first install what are called motherboard standoffs. These metal risers mount directly to the inside of the PC case and are designed to keep the underside of the motherboard from touching the metal body of the case. This is to prevent electrical shorts as well as to allow for better airflow and heat dissipation. Be sure to check out my article on motherboard standoffs for more information.
Motherboard Screws
Once you have the standoffs in place and holes line up, you should carefully install the motherboard screws. Sometimes they can be in hard to reach places, like in the corners near the power supply. My suggestion is to remove whatever component is in the way rather than risk damage by using a magnetic tipped screwdriver. Sometimes a pair of needle nose pliers helps the job, too.
Be very careful when installing the motherboard screws that your threads are lined up properly before you tighten them. I suggest only hand tightening because a power screwdriver could strip out the screw and potentially cause damage by making the standoff beneath come up and bend the motherboard.
In addition to the regular motherboard screws for mounting the motherboard into the case, you may also have some screws for attaching the heat sink for the CPU. I know that on HP brand business computers, they use a four-prong screw set that mounts the heat sink directly on top of the CPU, then has a plastic air flow duct that snaps over the top. Be extra careful when installing these type devices, especially if they have springs on them. You don’t want to overtighten and damage your CPU or the motherboard.
(Image credits: Tomshardware.com)


