Learn how to lower a computer’s CPU usage by ending processes using a large amount of CPU with your task manager, closing hidden long-running applications in the system tray, and stopping programs from starting up with your computer.
Using the Task Manager
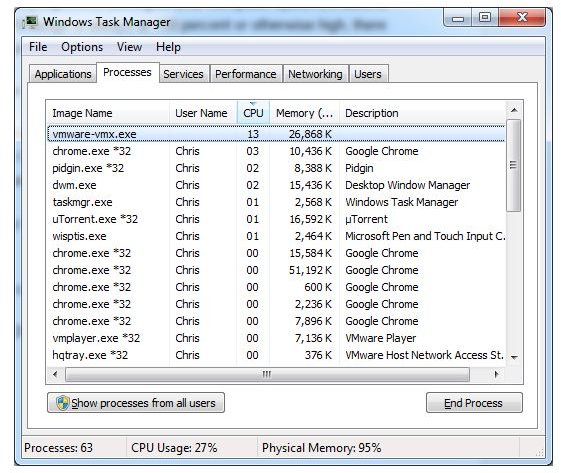
Windows includes a task manager application that shows programs and their CPU usage. By viewing which programs are using your CPU , you can make informed decisions on what to disable to lower your computer’s CPU usage.
1. Open the Windows Task Manager by right-clicking your task bar, then clicking “Start Task Manager.”
2. View the processes running on your computer by clicking the “Processes” tab.
3. Sort the processes in order of their CPU usage by clicking the “CPU” header above the list of processes.
The process at the top of the list is using the most CPU. Close a misbehaving process by right-clicking it, then clicking “End Process.” If a program you use is consistently taking up the majority of your CPU resources, you might want to look for a more light-weight alternative.
You may also be interested in these guides to troubleshooting high CPU usage in Mozilla Firefox , Windows Media Playe r, or Microsoft Outlook .
Closing System Tray Applications

Many applications, especially instant messaging programs and file downloading programs, keep running in the system tray when they’re closed. On Windows 7, where most system tray program icons are hidden by default, it may not be immediately obvious that other programs are running in the system tray. If you have a lot of these programs running, they may slow down your computer.
View the hidden programs running in your system tray by clicking the up arrow icon to the left of the system tray.
Close programs you don’t need running by right clicking their icons and clicking “Close” or “Exit.” If they start each time you boot, try going into their Options menu and disabling the autostart option.
Disabling Startup Applications
A common cause of high CPU usage and slow booting of Windows is having a large amount of startup applications. Lower your computer’s CPU usage by disabling startup applications you don’t use. There are a couple of different places these startup applications are located.
Check the Startup folder for startup applications by clicking “Start,” clicking “All Programs,” then clicking the “Startup” folder in the Start menu. Programs in this folder automatically start when you login to Windows. Remove startup applications you don’t use by right-clicking them under the “Startup” folder, then clicking “Delete.” Don’t worry, this just removes the shortcut under the Startup folder, the application will still be installed.
View and disable more startup applications easily with one of these free startup manager applications .
Of course, if you’re comfortable editing the registry, you can remove also startup entries by hand. Open the Registry Editor by clicking “Start,” typing “regedit” into the Start menu’s search box, then press “Enter.” Navigate to the “HKEY_LOCAL_MACHINE\Software\Microsoft\Windows\CurrentVersion\Run” and “HKEY_CURRENT_USER\Software\Microsoft\Windows\CurrentVersion\Run” keys in the registry. You can view and delete startup entries in these locations.


