What a Jump Drive is and How to Install It
What is a Jump Drive?
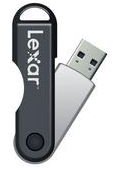
A Jump Drive is the Lexar brand name for a USB storage device. Technically, the computer industry refers to this drive as a USB Flash Drive (UFD) but people are generally unfamiliar with this abbreviation and more often use terms like flash drive, memory stick or thumb drive. The word “Jump Drive” is sometimes used by people when referring to any brand of USB drive in the same way “Kleenex” is often used to refer to any brand of tissue. There is no difference in function between a Jump Drive and any other portable storage device, just like there is no difference between the function of different brands of tissues.
These devices consist of a tiny circuit board with a memory chip. At one end is a USB connector, which can be plugged into a USB port on any computer. Jump Drives support the “plug and play” feature so that a user doesn’t have to reboot his or her computer to use the drive. The memory size varies from model to model, ranging anywhere from 2 GB to 64 GB. As such, the price for different memory sizes increases as the capacity of the drive gets larger, and different models of USB storage devices cost more.
USB storage devices have rendered floppy drives, ZIP drives and a handful of other older storage devices totally obsolete. USB storage devices are a faster and safer method of storing files including audio, video, personal documents, and more. Additionally, they allow much more reliable data access, can hold many times what older devices could hold, and tend to be much easier to carry around, with many being able to clip onto keychains, placed in wallets, or even worn as necklaces. Whether you want to build a portable music library, back up data files or archive programs, a Jump Drive is a great investment for use with your computer.
Installing a Jump Drive
In order to install a Jump Drive on your computer, here are the steps that you need to follow:
Step 1: Plug the Jump Drive in
Remove the lid of the drive and slide the USB connector into your computer’s USB port. Immediately, the device will be powered on and the installation of any drivers or software needed to use the jump drive will begin. These drivers are usually miniscule in size, and won’t effect your computer’s performance in any way. In fact, almost every accessory that you use with your computer comes with built in drivers that are installed once you plug in the device; this holds true for printers, wireless mice and keyboards, and speakers.
Step 2: Wait for the installation to complete
A few seconds after plugging into your computer, the operating system will finish installing it. Windows will show you a notification message telling you that the storage device is now ready for use.
Step 3: Install additional software
The device might have come with software such as a drive explorer, encryption or other such software. After a successful installation, Windows may show you a message box stating that you can install extra software for the drive. Simply follow the instructions on screen to install the software. It is not necessary to install additional software, although certain features may not work if you decline to install it. To quickly begin using your Jump Drive, you can skip this installation, though it is recommended to read through the details of any software included, as many USB software suites are actually quite helpful and make using your USB device much easier.
Step 4: Access the Jump Drive
Once all the installations are complete, locate the drive icon on your computer and open it. You can now copy and paste files or folders into the drive and access them later when needed from other computers.
Jump Drive Removing Tip
When removing the Jump Drive from your computer, first ensure that you’ve turned it off. Removing the drive without turning it off may cause it to lose any data that you’ve put on it during this session with the computer, or any data that was previously stored on the drive as well.
To turn your the USB drive off in Windows, click on the “Safely Remove Hardware” icon in the system tray and click Stop. In Apple OS X, you can do so by simply dragging the drive icon onto the Trash, or clicking the small eject button that will appear next to the drive’s icon in your finder window. After that, you can simply grab the jump drive and remove it from the computer.
