Here is a simple checklist to enable you to install Windows Server 2008. Simple, step-by-step instructions on how to setup and configure the newest server operating system from Microsoft.
Streamlined Installation Process
Installing Windows Server 2008 is much like installing Vista or Windows 7. The install has been streamlined and much refined since the old days, and is now a straightforward process.
The bulk of the work is done automatically by the installation program. You will be asked for input occasionally, but apart from that you are a passenger on this ride. So let’s walk through the process step-by-step.
Firstly, you will need a minimum hardware specification of a 1Ghz processor, 512Mb of RAM, 10Gb hard drive space and a CD or DVD drive. The recommended requirements are a 2Ghz processor, 2Gb RAM, and 40Gb hard drive space.
There are specific software upgrade paths, but for the purpose of this guide, we assume that you are installing fresh.
-
Set the first boot device to the CD or DVD drive and reboot the computer or server with the Server 2008 disk inserted and boot from it when prompted.
-
Wait for the boot loader to install the necessary files and set up the installation wizard. You should see a black screen with the message “Windows is loading files.”
Advertisement
-
Enter your regional information then Next.
-
Click Install Now.
Advertisement -
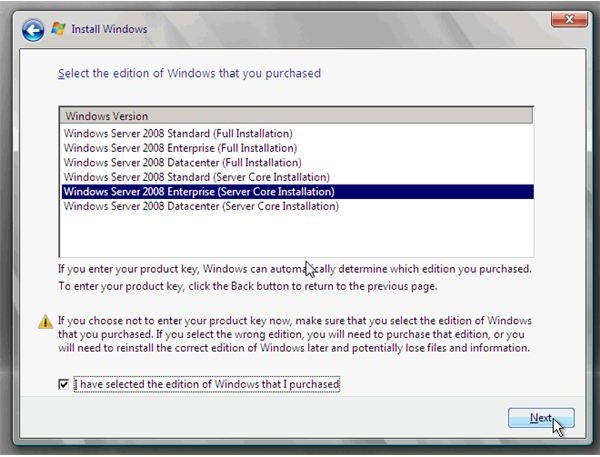
Enter the product key, or press No to enter it later. If you select no, you will need to manually select the edition of Windows you have. There are currently six standard choices, so you will need to get this right. Otherwise, the system won’t accept the key when you do provide it.
-
Read and accept the license terms then click Next.
Advertisement -
Choose the type of installation you want and select Next. In the majority of cases it is advisable to select Custom, and perform a fresh install.
-
Choose the disk you want to install to and then click Next.
Advertisement -
Now it’s time to relax a bit. The installer will now work its magic and decompress the files and install the operating system. There will be a reboot or two. Only interfere if prompted, or if the machine doesn’t boot properly.
-
Once the setup is complete and the machine rebooted. Press Ctrl, Alt, Del to log on and enter the Administrator details, including a password when prompted.
Advertisement -
Log into the desktop and install your drivers and applications, or have a look around.
That is installing Windows Server 2008 in a nutshell. It doesn’t take that long, and it is certainly much easier than installing Windows NT or 2000. Most of the work is done behind the scenes, and the default configuration is usable for most situations.