How to Check a Computer Power Supply: PSU Testing
Overview
If you were to think about your computer as a human body, which component do you think would be the heart? Just like our heart supplies blood to the body, the power supply in a computer supplies and controls power to the other components in the computer. If there is a problem with it, the entire system could be effected. Blue Screens, random reboots, dead machines, failed boots, and other intermittent problems can all be linked back to a faltering power supply.
There are ways to test some components in the computer easily enough, but the power supply is a tricky one. If the problem only happens once in awhile, it could take a very long time to figure out. Because of this, there is a special power supply testing tool that we can use that will not only identify problems on the main power connector of the power supply, but on every single one to ensure that it is functioning at 100%.
Multiport Power Supply Testers
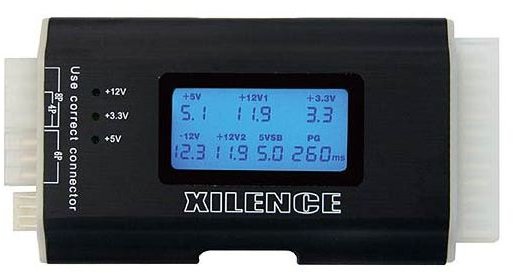
Newer, more advanced multi-connector power supply testers have many different sockets on them so that you can test every single cable on the power supply. The one linked above from Newegg.com is only $14 and includes sockets for 20+4 P1, SATA, 4 pin, 6 pin and 8 pin power connectors. A series of lights indicate whether there is a problem or not, as you cycle through the various connectors on the power supply.
Running the Test

In order to use a power supply tester, you might have to remove the power supply from the case first. This involves opening up the case, unscrewing the power supply, unplugging all the connectors, and taking it out. This guide on how power supplies are installed may be of use to you when _un_installing yours. Hopefully, you can open the case and unhook all the connectors without removing the PSU itself from the case.
Once you have disconnect the PSU, it’s time to test it. Plug the regular power cord into the back of the power supply, as usual. Plug the P1 (20+4 pin) power connector into the designated area on the tester. Plug the power supply into the wall and turn it on (if you have to). If your main connector is functioning, you will see green lights on all voltages and possibly hear a sound (indicators varie by make and model of tester). Leaving the P1 plugged in, test the rest of the connectors in their respective sockets. For the Molex connectors, +12 and +5V should light. For 4/6/8 pins, +12V should be lit. For Floppy, +12 and +5V should be lit. For SATA, +12, +5 and +3.3V should be lit. If there is a problem with the main connector, then you’ll need to purchase a new power supply. If another connector has a problem, check the other identical ones. If you only have one bad connector, just don’t use it. If all of a certain kind have a bad voltage, it’s time to reach into your wallet.
