Recovering from Overclocking Boot Problems Finding Your CPU Voltage
As we said in the introductory article, overclocking can damage or destroy your equipment very easily, and you are likely to void your warranty in the process. Never overclock anything that is of a mission critical, medical, safety, or other such nature. Overclocking, by definition, involves running things out of manufacturer specification, which carries a risk of damaging or destroying equipment. Knowing that things can go wrong, let’s discuss how to keep the risks to a minimum.
When Things Go Wrong
The main danger from overclocking is the potential for damage to equipment due to voltage. Heat is theoretically a problem, but modern hardware will just shutdown if it gets warm enough to think it is going to be damaged (we’ll discuss cooling a CPU later) Pushing voltages can do a lot of damage quickly, if not instantaneously. It can also result in very insidious problems, where the chip appears fine at first, but starts to bug out with greater frequency as the overvoltage does damage over time.
If your overclocking goals are modest, in the neighbourhood of a %10 percent increase, there isn’t much to worry about. You can leave your voltage settings alone. Usually these say “Auto” or some such in the BIOS. This is fine for a conservative overclock. The worst thing that will happen is having to reset your BIOS.
OK, I Turned Up the Clock and Now it Won’t Boot Up!
That is ok, you just turned it up too far. If your system gets far enough along in the boot up that you can get back into your BIOS, do so. If your system won’t boot up at all, you will need to reset the CMOS. How to do this is dependent on your motherboard, check its documentation. Usually you have to move a jumper from one place to another, turn the computer on, then turn it off, put the jumper back to the original location, and turn it on again. Some motherboards designed to be friendly to overclockers will let you clear the CMOS with just the push of a button.
Long ago, before buttons or even jumpers were available, the only option was removing, waiting a minute, and replacing the motherboard’s battery (they use the same batteries as calculators). This is a less reliable procedure than switching a jumper, let alone pushing a button. You are supposed to be able to change jumpers all the time, but a motherboard will usually see its entire life under one owner without a battery change. Start popping the battery in and out and you risk breaking the clips that hold it in place. Though the battery is big and shiny and easy to find, don’t get lazy and use it instead of the jumpers to clear your CMOS.
Clearing the CMOS sets the BIOS back to its factory default settings. Because of this, and because it can be hard or impossible to check something online when you are having system trouble, write EVERYTHING down while overclocking. And though screwing with your CPU clock is unlikely to burn a hard drive, you really should backup your data before you change anything in the BIOS, overclocking or otherwise.
However you get back in the bios, you’ve gone as far as you can for now with your overclock, and you either need to back off on the clock, or, if you are comfortable with the risk/reward potential outlined below, increase one or more voltages.
Auto What?
More aggressive overclockers traditionally push their CPU as far as it will go, then increase Core, North Bridge, and other voltages to increase stability. The problem is that, in an effort to simplify overclocking, motherboard and BIOS makers have gone from “Auto” –matically detecting factory settings, to “Auto” –matically setting the voltage to what it thinks is needed to run the clock settings you have entered.
Again, this is no problem for small overclocks, but if you are turning your clocks right up, your motherboard might be turning the voltages up unbeknownst to you. This makes the decision for the more aggressive overclocker whether to research and enter the highest voltages they’re comfortable with, or to trust their motherboard with the decisions.
This boils down to how good the information you can find is and how confident you are in your skills. Your motherboard will probably do a pretty good job, but if you can find the details you need and where to put them in your BIOS, doing things manually is probably safer and will get you a better number.
Where Do I Find Voltage Information?
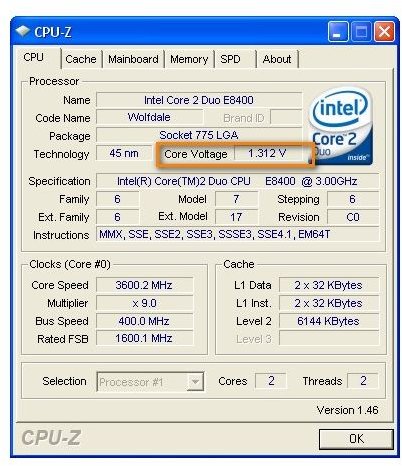
Finding CPU voltage info isn’t too difficult. You can get the basic core setting from this database at techpowerup.com. Getting the range for these (usually called Vid min and max) requires that you poke around manufacturer support databases. The maximum of this range is regarded as a safe number by many overclockers, since it is still technically within manufacturer recommendations. The CPU-Z screen indicates a Core Voltage of 1.312, below the Vid max. You can search for your Intel chip here. Go here for AMD Phenoms, Athlons are here. Follow the links to the Thermal and Power data for your CPU.
Finding the voltages for your motherboard and its chipset is far more difficult. Manufacturers seem to want you to trust their Auto settings. I hate to send you out in the cold instead of link you where you need to go, but the best way to find your maximum safe voltages is just type your motherboard name or chipset along with the word “voltages” into a search engine.
What Do I Do With Voltage Information?
That depends on your overclocking goals. Again, the modest overclocker can ignore this voltage discussion. The next step would be to use recommended safe voltages you come across at official sources online. Finally, you can push your performance (and luck) by seeing what kind of results other people are reporting on overclocking forums, and emulating appropriate examples.
Finding appropriate examples is not just about similar equipment, but similar goals and attitudes regarding overclocking. If you browse forums, you will find that people overclock for different reasons and have different levels of technical interest and skill to put into it. Find those that seem to be looking for the same things from their equipment as you, not only performance wise, but in terms of budget and reliability.
Pushing voltages hard is something few overclockers, let alone average users, do, as the increased performance comes at the expense of your equipment’s longevity. It is a rare breed that is willing to cook a chip in a month just to have a hair more speed.Keeping voltages stock or within safe limits and seeing how fast the CPU will go is as aggressive as most overclockers get. Many will just get their little five or ten percent boost and leave it at that. The name of the game for most is not to break records, but to get some extra performance out of a system, almost for free.
We say almost because some considerations, like cooling, and having a motherboard that is up to the task, can add a bit to the price of the system you intend to overclock. We cover this in the next article.
This post is part of the series: Comprehensive Overclocking Guide
Whether you’ve done it before or you are an old pro looking for some new tips, we’ve got your overclocking guide. We explain what overclocking is, why chips make good candidates, how to get the info you will need, what can go wrong, how to fix it, other relevant equipment, and specific procedures.